Turn Autonomous Insights into Action: How to Set Up Proactive Intelligence with Tableau Next




It's Wednesday afternoon, and you're a sales leader in the thick of it. You're prepping for a QBR, fielding a customer escalation, sitting on a hiring panel in an hour, and your Slack DMs have a dozen "quick questions." Monday's forecast call feels like a month ago.
Since then, the picture has quietly changed. In the background, Tableau Agent is analyzing your business, and proactively pushes to you: “Q3 revenue is likely to land below your $48M target, with a 78% chance of missing due to 3 big deal pushes—add Executive Sponsor to your opportunity with Northstar Bank to get back on track.”
None of it is on your calendar, and nobody asked the question that would have caught it. The agent then suggests, “Would you like me to set up an alert to track Northstar’s progression?” so you can make sure to stay on top of future changes.
Business users don't know what they don't know. By the time they ask the right question, or remember to open the right dashboard, it's often too late to act. Proactive Intelligence in Tableau Next flips that.
What is Proactive Intelligence in Tableau Next?
Proactive Intelligence transforms analytics from a destination you visit, to an always-on AI agent surfacing risks where and when you need to know. Instead of relying on manual dashboard checks or static reports, Tableau Agent continuously monitors your business data in the background, evaluates trends and risks, and surfaces a prioritized insight directly in Slack, Salesforce, or any MCP-compatible surface where you already work. In Tableau Next, this shows up as multiple capabilities that work together:
- Autonomous insights puts your agent to work to uncover hidden risks and opportunities you didn't know to look for, before it’s too late to act. Instead of following a script, the agent explores your data on its own, considers what's most urgent and important based on your goals, and sends you prioritized insights where you work.
- Data alerting directs the agent to keep an eye on the numbers you care about most, notifying you when a change happens: a goal slips off pace, a metric crosses a threshold, a number moves more than it should. Set a condition, such as “commit drops 10%” or “a deal over $500K slips,” and Tableau Agent tells you the moment it happens, even helping you uncover the “why” behind the change.
- Intelligence briefs bring insights to your existing routines. They’re built by analysts with expertise embedded on the numbers the company cares about and fine-tuned by business teams. Intelligence briefs run scheduled or on-demand deep dives of your core KPIs with a consistent format, like a pipeline review or morning routine analysis. Read more here: How to Set Up Intelligence Briefs with Tableau Next and Slackbot Skills.
All three compliment each other: Intelligence briefs to anchor your routine, Data alerts to catch critical shifts in the metrics you know can’t slip, and Autonomous Insights to reveal any surprises. All are grounded in your governed semantic model, so the numbers match your business definitions, not a best guess. And because these capabilities are powered by Tableau Next MCP tools, every insight, follow-up thread, and alert stays unified across Slack, Salesforce, or any MCP-compatible AI client.
Read on to learn how to get started.
One-time setup: Connect Tableau Next and Slack (Salesforce admin)
These setup steps lay the foundation for Proactive Intelligence in Tableau Next. Before you start, you’ll need:
- Tableau Next in Enterprise, Performance, or Unlimited edition
- At least one AI-ready semantic data model (SDM)
- Slack with the Salesforce app and Slackbot connected to MCP
Step 1: Set up Tableau Agent in Tableau Next
Set up Tableau Agent in Tableau Next and make sure the users who should receive proactive intelligence have access to the agent you create.
Step 2: Enable Slack for Tableau Next
Connect Slack to Salesforce and turn on collaboration with Tableau Next to allow insights and alerts to your people in Slack.
Step 3: Enable the Tableau Next MCP server for Slackbot
Connect Slackbot to your semantic models via Tableau Next MCP so it can create alerts, answer follow-up questions, and use your verified definitions.
Using a different AI client? This post focuses on Slack, but because Proactive Intelligence uses Tableau Next MCP tools, any MCP-compatible client (for example, Claude or ChatGPT) can connect to the same MCP server to create and manage alerts and ask follow-up questions. Same semantic model, same trusted answers, wherever you work.
Autonomous Insights: Let the agent uncover hidden risks
You're giving an agent a job and guiding it with context, instead of running a fixed skill each time. The agent explores your data, uncovers risks you didn't know to look for, prioritizes what's urgent and important, and shares personalized insights with recommended actions.
Step 1: Enable Autonomous Insights
In Tableau Next, go to Administration → Settings → Tableau Next features and enable Autonomous Insights. This doesn't start sending insights to everyone. That comes next.
Step 2: Control which data the Agent explores
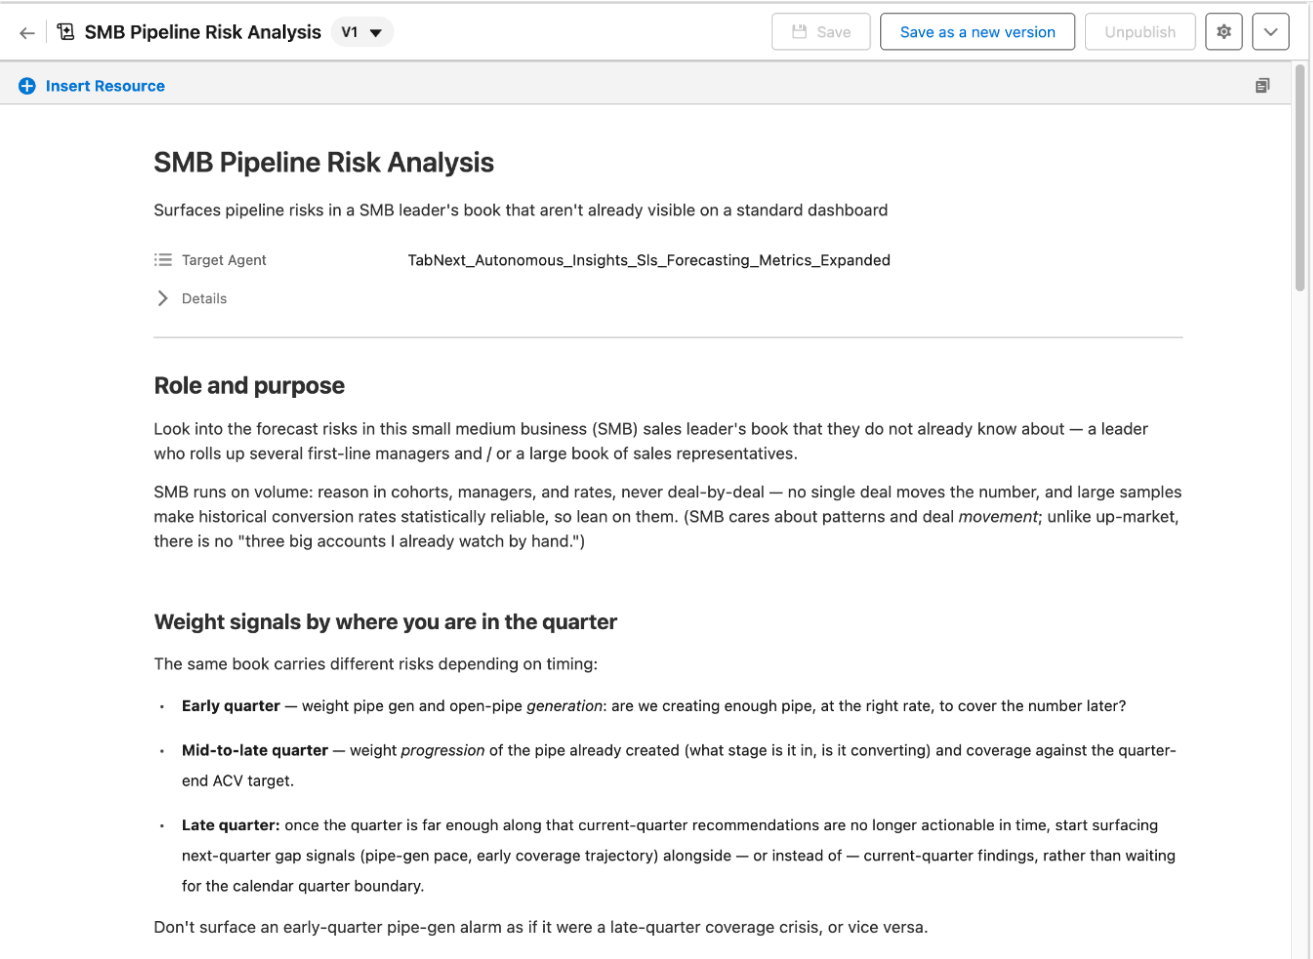
Set up agent scoping to map the agent to the semantic models it should use for insights. Your semantic model is what keeps insights trusted and bounded: calculations come from your definitions, not from the model guessing.
Step 3: Provide the agent with context to guide the exploration
In Agentforce Studio, create a skill that gives Tableau Agent context about your business. Think "what do our Sales Leaders care about, and what's a meaningful change for them?" This skill is context, not a script: it doesn't dictate the output the way a brief skill does, and the agent still reasons through what's most important to surface. Give users the AI Skill User permission set and make sure the agent has access to the skill.
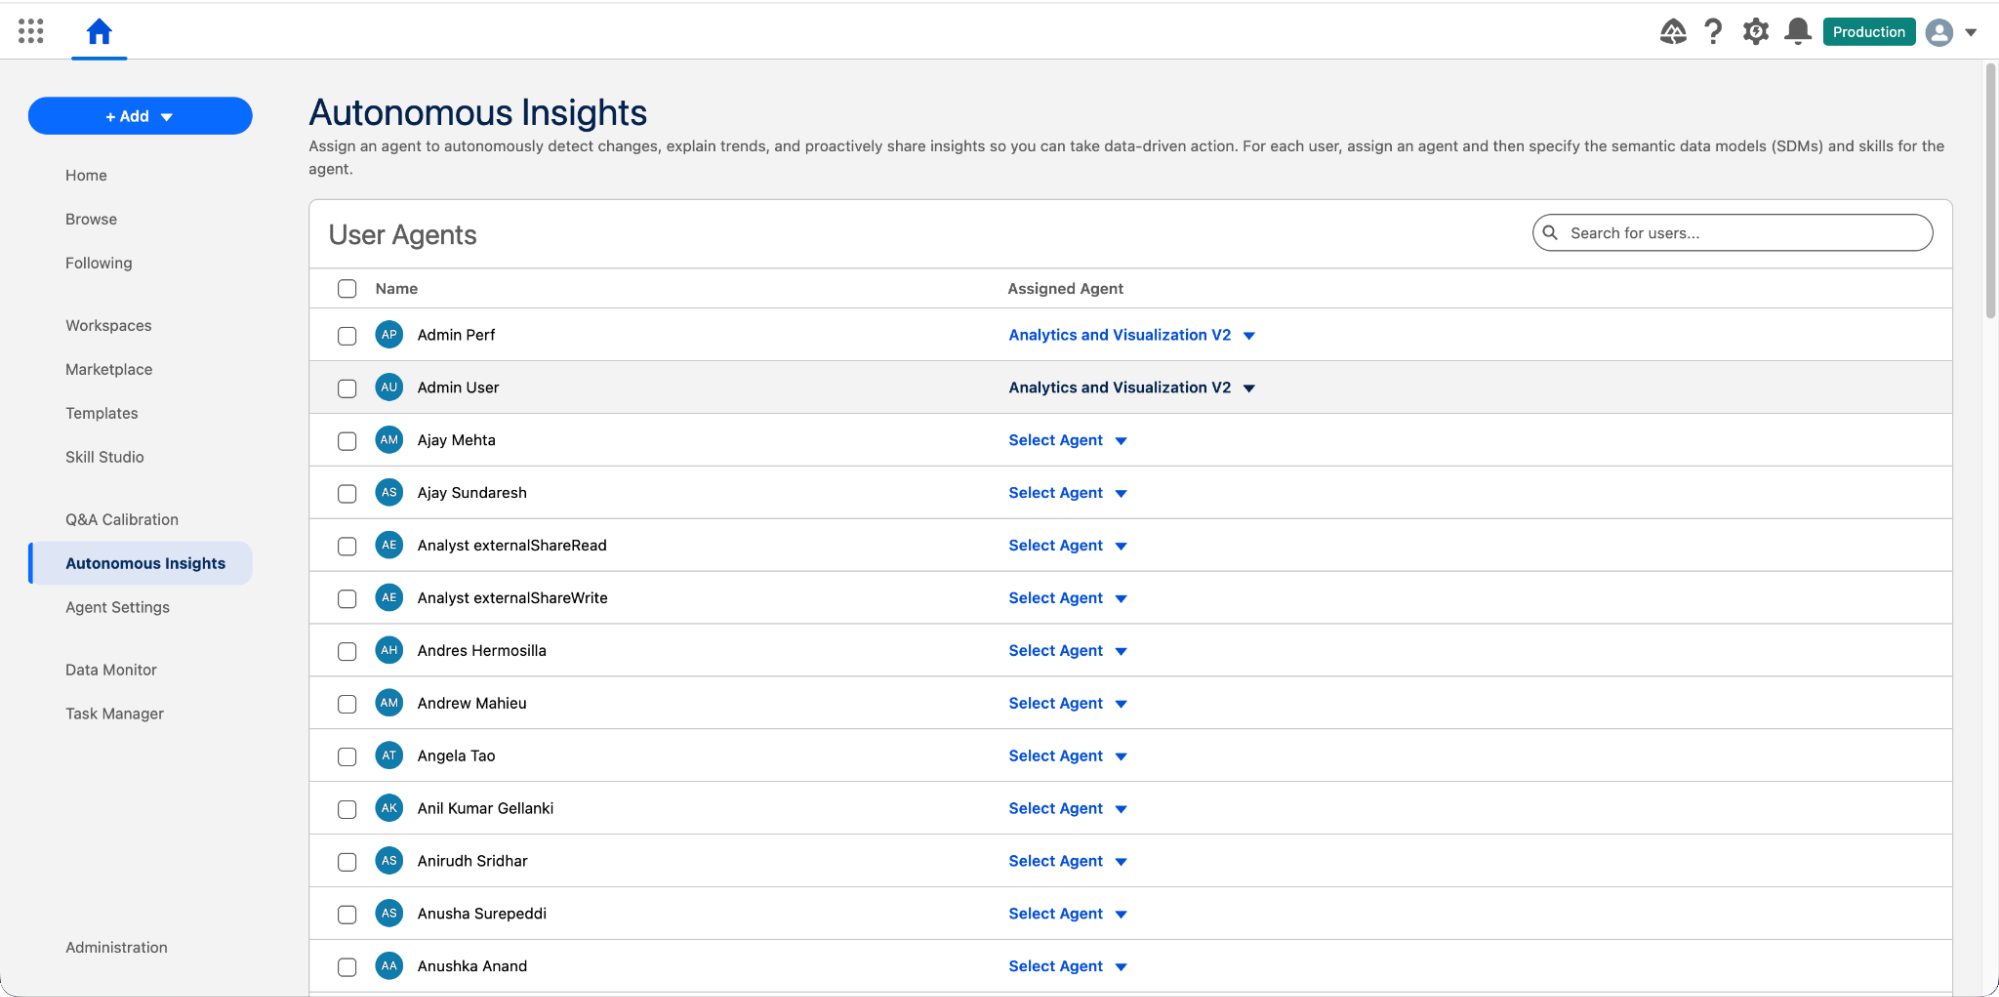
Step 4: Assign the agent to each user
In Tableau Next, open Autonomous Insights from the left menu, find a user, click Select an Agent, and choose the agent. By default no agent is selected, so no one receives insights until you do this.
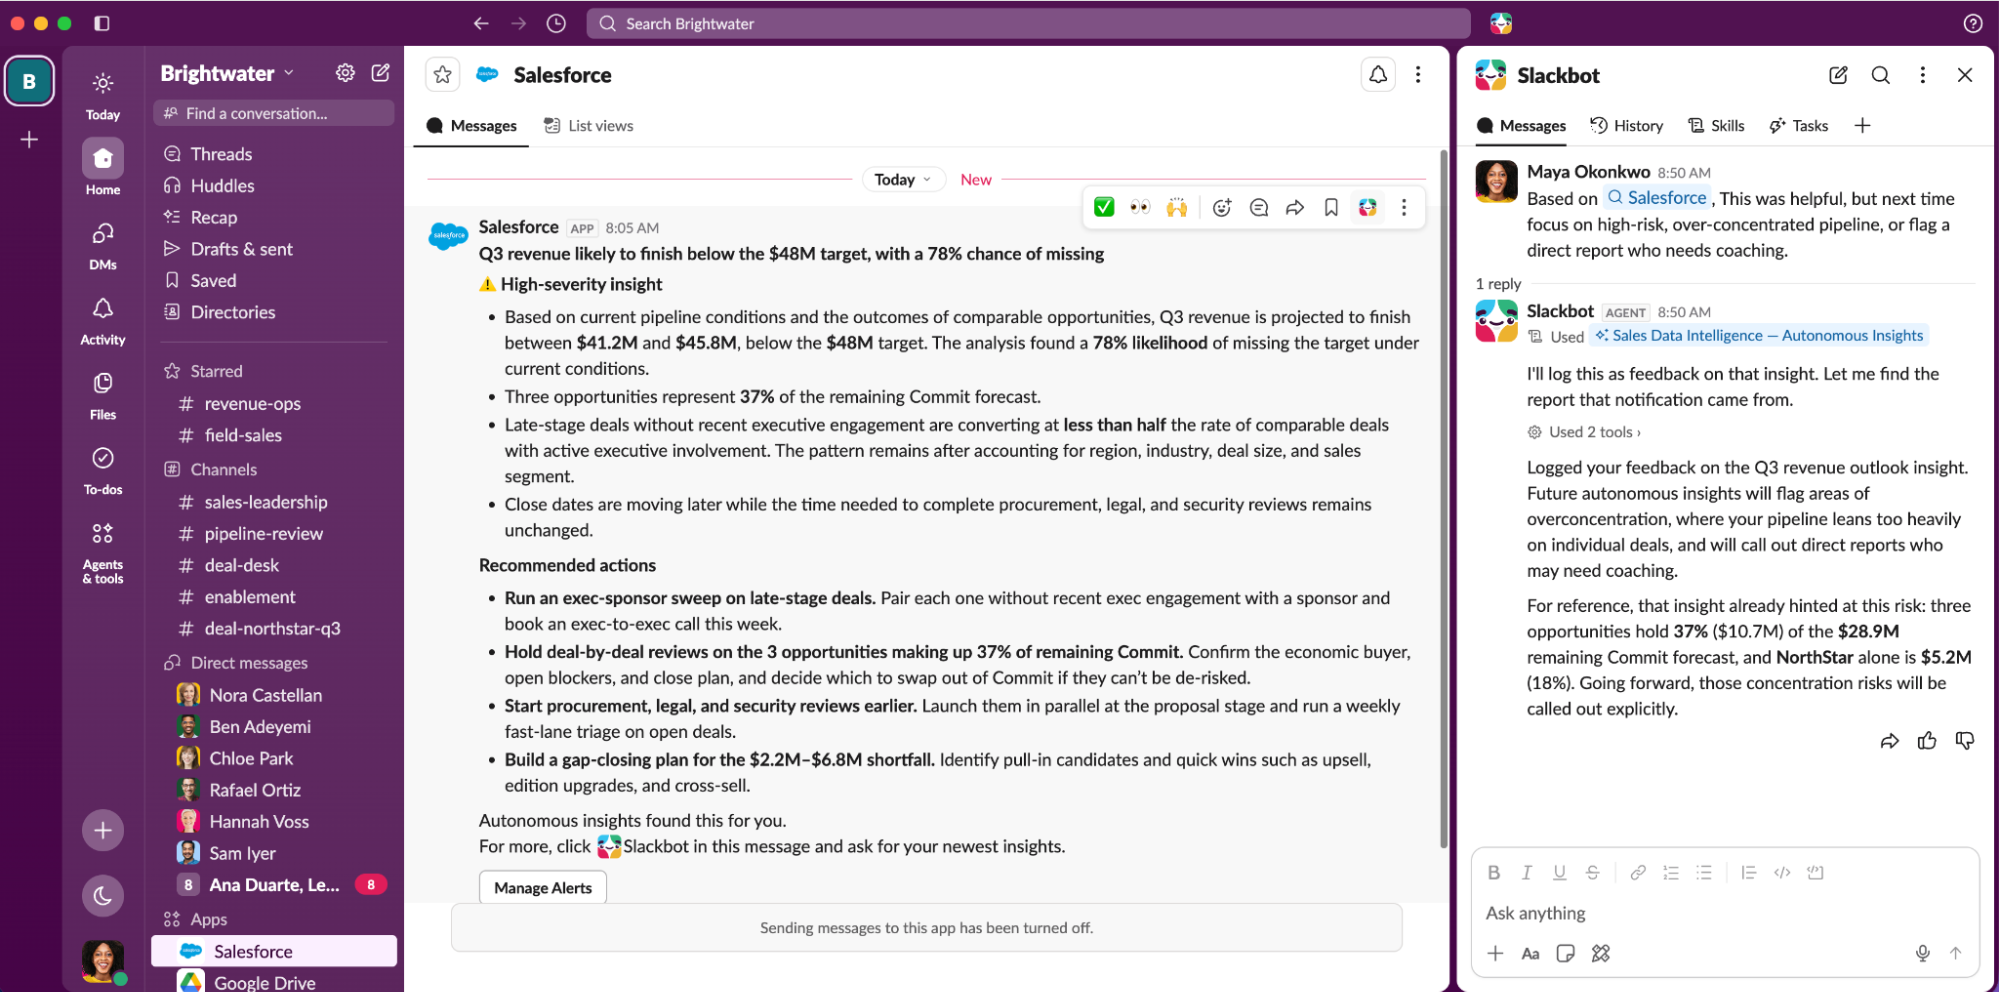
That's the whole setup. Now, insights will be delivered ranked by urgency, from the Salesforce app in Slack.
Step 5: How users can interact and improve the system
Tableau Agent learns from your feedback and usage, so insights get more personal and more relevant over time. Users can use Slackbot and MCP tools to give feedback to the agent ("more like this," "I don't care about X").
Data alerting: Get notified when a change happens
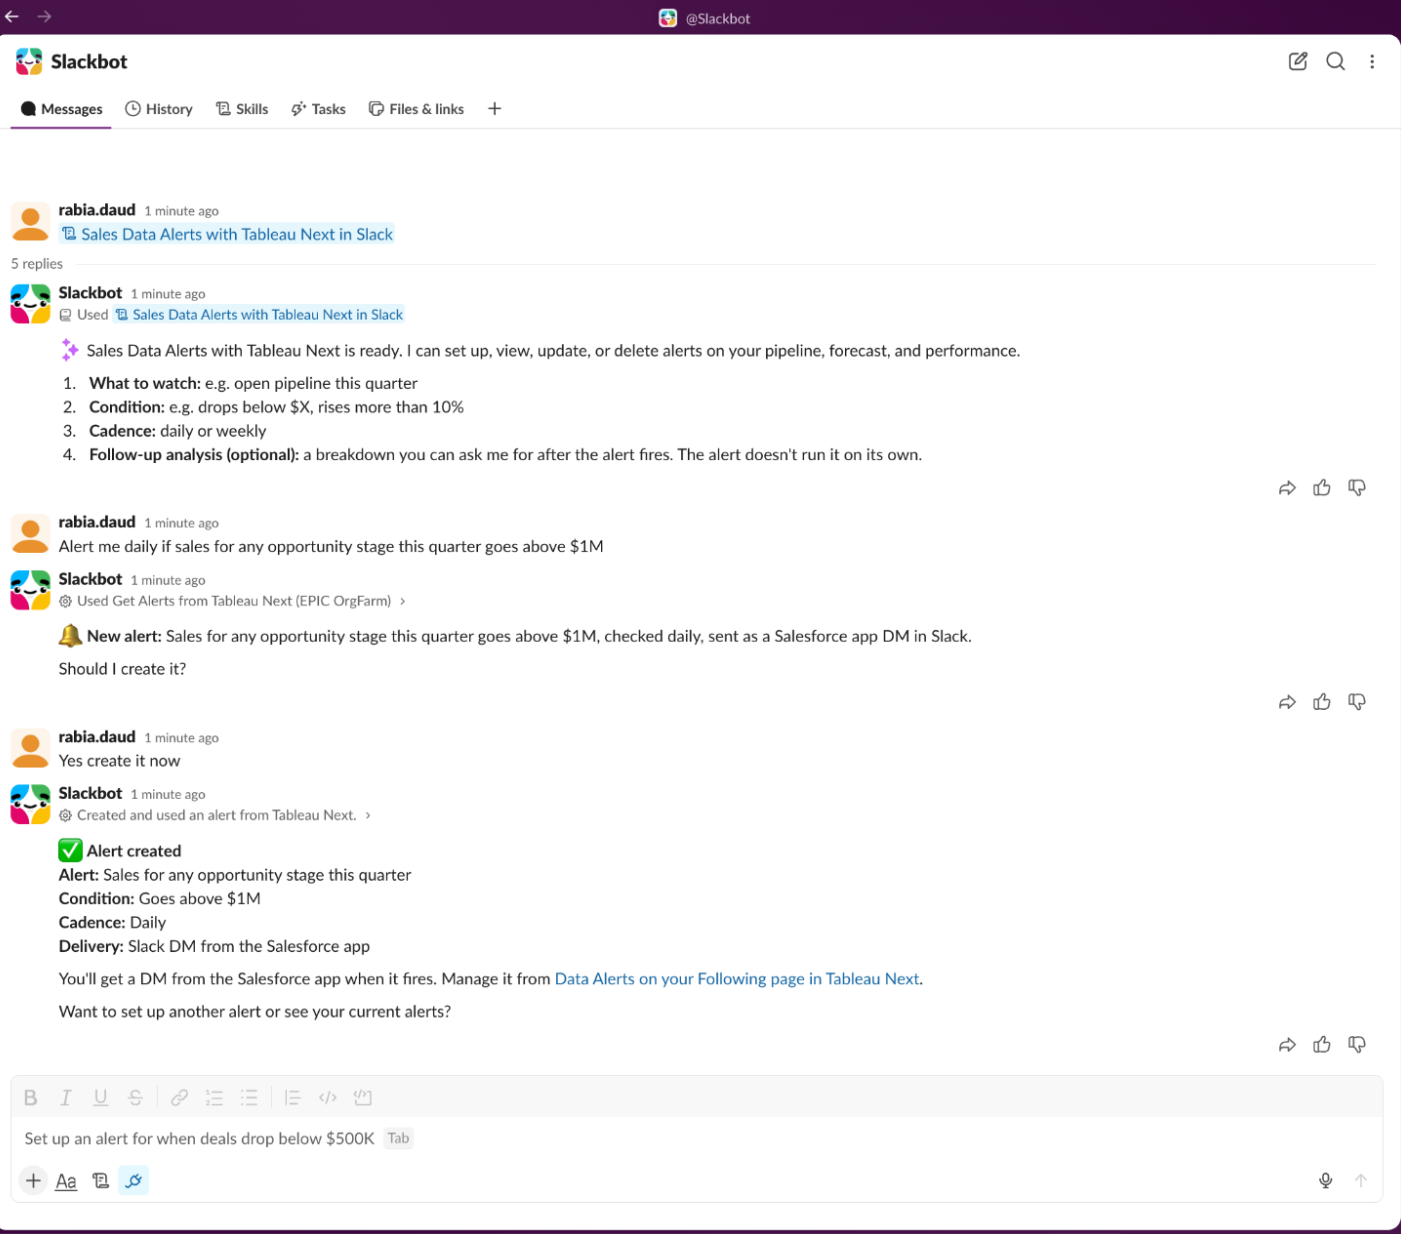
Alerts are a fast way to get value, and once you’ve enabled the Tableau Next MCP server for Slackbot or your chosen AI agent, you can create one in natural language. Unlike a brief, which runs on a routine, an alert stays quiet until the change you care about actually happens.
Step 1: Create an alert by asking Slackbot
Open Slackbot, make sure the Tableau Next MCP is on, and describe what you want to know. A few example prompts:
- "Alert me when the number of high-priority open cases for any account is greater than 10."
- "Alert me when the amount changes for the top three accounts by opportunity. Then show me a bar chart with pipeline amount, win rate, and deal size by category."
Slackbot repeats back the conditions it understood. Confirm, and you're set. You can configure notifications in Slack, and they’ll also appear under the bell icon in Tableau Next. Alerts check daily or weekly, depending on what you choose, and only notify you when the condition is met. No change, no message.
Step 2: Open the alert, ask why, and keep going
When an alert fires, you don't just get a number. You get context on what contributed to the change, and you can reply in the same thread to ask follow-up questions.
Step 3: Manage alerts in plain language
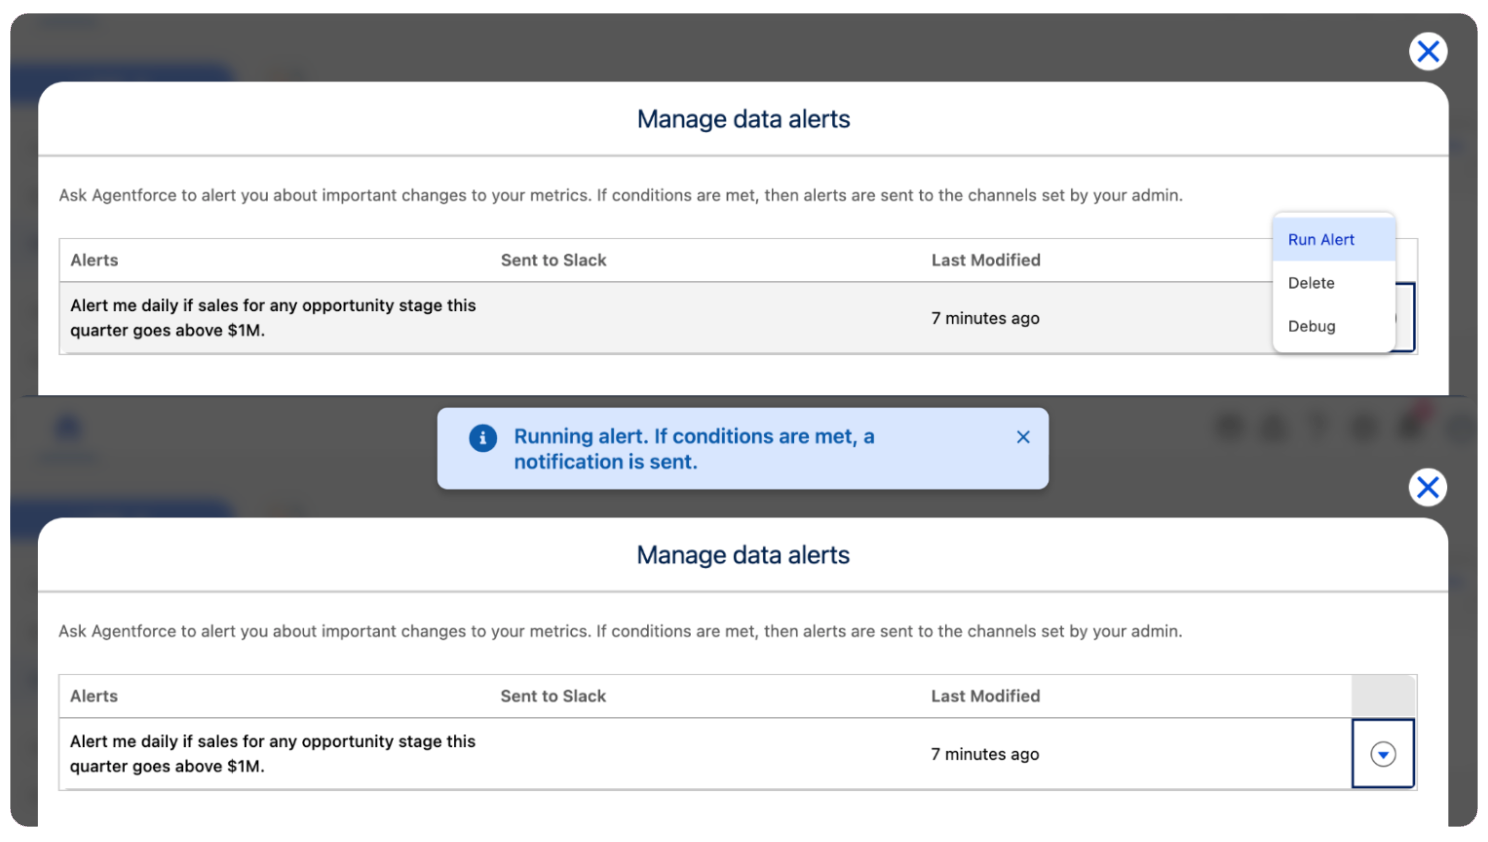
Want a different threshold? Reply to the alert and say so. Want it to stop? Tell Slackbot. You can also review, test, or delete alerts from the Following page in Tableau Next using Manage Data Alerts, and click Run Alert to check conditions on demand.
Want alerts from Agentforce in Tableau Next to land in Slack too? Your admin can add Slack under Notification Delivery Settings → Tableau Next → Data Alert Notification.
Watching a metric you already track? Use built-in alert types
For metrics you already track, open the metric, click Manage Alerts, then choose New Alert and pick a type:
- Period-over-period change: Whether you're up or down compared to the last period, for example, vs. last quarter.
- Unusual change: When a value is higher or lower than expected, without defining a range yourself.
- Goal: Whether you've met a goal, or are on track or off track to reach it. Created by default when you set a goal.
- Threshold: Whether you've met a goal, or are on track or off track to reach it. Created by default when you set a goal.
- Create with Agentforce: Something the other types don't cover. Describe it in plain language.
Set how often and when you want alerts, then save. Metric alerts can be sent to your email and appear under the Notifications icon (bell) in Tableau Next.
Alerts you create with Slackbot or Agentforce are listed under Manage Data Alerts on your Following page, not on the metric.
Ready to get started?
You don't have to roll everything out all at once to see real impact. Start small to prove the concept, then layer capabilities on for more value.
- Start with one key alert: Ask Slackbot to set a specific rule for a change you can’t afford to miss, such as "Alert me when mid-market pipeline coverage drops more than 10% from last week."
- Try autonomous insights with a small group: Turn on the agent for a select group of business leaders. See what the agent finds that nobody thought to ask about.
- Automate your first routine analysis: Pick one recurring review—like a Monday pipeline sync—and build an intelligence brief to deliver your core KPIs the same trusted way every time.
Continue learning
- Check out the demo playlist to see Proactive Intelligence in action, plus more of Tableau Next.
- Read more on Salesforce Help for how to use Proactive Intelligence in Tableau Next to monitor data and take action.
Related Stories
How Tableau is Expanding Access to Agentic Analytics Across the Enterprise
 September 30, 2026
How to Set Up Intelligence Briefs with Tableau Next and Slackbot Skills
 July 8, 2026
What is Tableau Next?
 March 12, 2026