Viz Variety Show: When to use a lollipop chart and how to build one


Editor’s note: Viz Variety Show is a new series that aims to help you go beyond bar charts and line charts. The series will showcase various types of visualizations and outline how to build them, when they should be used, and when they should be avoided altogether. This post builds on Tableau's own Andy Cotgreave's original tutorial on lollipop charts.
Let’s be honest—some variant of bar charts and line charts are the best choices in terms of visualization best practices for the vast majority of the vizzes any of us will ever create.
However, I think a chart’s appeal is sometimes more important than the best practices of the visualization you’re showing. Others would disagree. But you know what? I’m just going to say it. Nothing but bar charts and line charts is boring. It just is. Why not focus as much on the visual appeal of a chart as much as we do on the accuracy of the data and the interactivity of the dashboard? This applies to every part of a dashboard: titles, legends, filters, colors, and, yes, the chart type.
Unfortunately, aesthetic is often the last criterion used to evaluate which chart type is best. If your audience doesn’t find a dashboard or a visualization engaging, they are already starting out less interested in what you’re showing. Worst case, this means they’re moving on after only a glance at your hard work.
But present your data in an appealing way, and you’ll not only grab your users’ attention but also entice them to dive deeper into the data. One eye-catching chart is a little gem called a lollipop chart, which looks something like this:

Common use cases:
- In lieu of many bars of the same length (often to avoid Moire effects—more on this later)
- As a built-in/consolidated legend
- A visually different alternative to side-by-side bars
- Alternative to a Gantt chart
Not ideal when:
- There are unsorted bars of very similar length—it is harder to compare the lengths of two very similar lollipops than standard bars
- You need stacked bars—with how much is going on in a stacked bar, this usually ends up being more confusing than clarifying
Final disclaimer: A standard bar chart is the best-practice choice here, so you should only read on if you’re an artist, an anarchist, or both.
The first use is my most common; frequently you will have a visualization where you are displaying many bars of the same length. But this can result in a very large amount of “ink” on screen, which is a bit hard on the eyes. In addition, you may unintentionally have one view dominating your dashboard due to the presence of color. If the main purpose for the chart is to show how these bars differ from one another, this is a lot of extra chart just to display the difference between the values. Take the below example:

It’s hard to ignore that the bar chart dominates the dashboard. There are standard techniques you could take to try to mitigate this such as changing the size or position of the sheet, thickness or saturation of bars, orientation, etc. For any number of design reasons, these are not always a valid option. The larger and more saturated these bars are, the more likely you are to experience a nasty little optical effect called a Moiré pattern/effect. This is when you start to see “patterns” that don’t exist due to your senses being overloaded by what your eyes are taking in.
Take the below example and notice how your eyes have difficulty focusing. You probably notice the effect that almost seems to cause motion between the bars nearer to the middle:

I’m truly sorry for the hideous bar chart. It’s a bit of a hyperbolic example, but I hope it drives home the point—for whatever reason, sometimes bar charts aren’t the ideal choice. In some such cases, lollipops may be one of the good alternatives. Now that you know a bit more about when I prefer to use them, let’s look at the required steps to build a lollipop chart:
1. Build the charts
Build a bar chart and duplicate your measure on Rows or Columns.

2. Create a dual axis
Create a dual axis of your measures by right-clicking the second measure (or second axis) and selecting “dual axis.” Tableau will likely convert these both to circle charts if you leave the mark type set to automatic, so now is a good time to override the first measure type and switch this to bar. You’ll also want to make the bars a lighter color. I usually use a lighter gray, but pick whatever fits your dashboard best.

3. Format your marks
Next you’ll want to work out sizing and spacing of the marks. The first thing to do is to right-click the second measure axis (the one to the right), and choose “synchronize” to make these axes equal. You’ll also want to rid yourself of the second, redundant axis by right-clicking the axis again and unchecking “show header.” This will ensure that you have marks which line up correctly. Adjust the size of the bars to make them thinner, and make the circles a bit larger with the Size slider on the Marks card and you should end up with something like this:

4. Add your flair
Hopefully you can see the resemblance and why the chart gets its name, and now you get to make your final design decisions on the lollipop chart. You can choose to color the circle based on some KPI logic or by another measure. You can also include custom shapes (you can find a good article on this technique here) which is what I will do. This is as simple as changing the mark type of the circles from "circle" to "shape" and assigning the correct shapes from your repository.

And now you've got a lollipop chart! How do you use this chart type—or how do you imagine using it in the future? Share your use case in the comments below.
Related Stories
5 Ways to Use Tableau Public to Achieve Your Goals
 January 11, 2025
World Mental Health Day: Elevating Awareness Through Data Visualization
 October 10, 2024
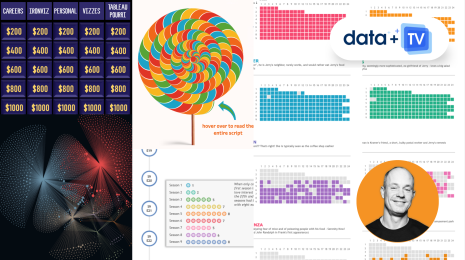
From TV Screens to Tableau: Visualize Your Favorite Shows with IMDb
 August 31, 2024