Tutorial
Embed your dashboards in a web app in 20 minutes
The goal of this tutorial is to quickly setup a sample web app that shows how your Tableau Dashboards can look when embedded.

Goals
The goal of this tutorial is to quickly setup a sample web app that shows how your Tableau Dashboards can look when embedded. Tableau provides several ways to Embed Views into Webpages . While the easiest method is to click Share and click Copy Embed Code, we want to show you what's possible when you use the Tableau JavaScript API. This is not meant to be a standalone product, more a reference implementation for how to get started with embedding and modern web technologies. We should be able to get this web app up and running within ~20 minutes.
We also aim to show how different parts of Tableau Server can be used to provide a rich user experience.
- JavaScript API - We use this to embed dashboards into the web app, but also to programmatically interact with those dashboards.
- REST API - We use this to authenticate to the Tableau Server, and dynamically populate a list of dashboards the user has access to. We also leverage this to query data from dashboards, get project/workbook metadata, and export/download dashboards.
- Tableau Repository - The Postgres database built into Tableau Server contains a lot of information about historical trends and other data points not available from the REST API. By creating some workbooks that query the repository, we can make that information available using the REST API and the Query View Data endpoint.
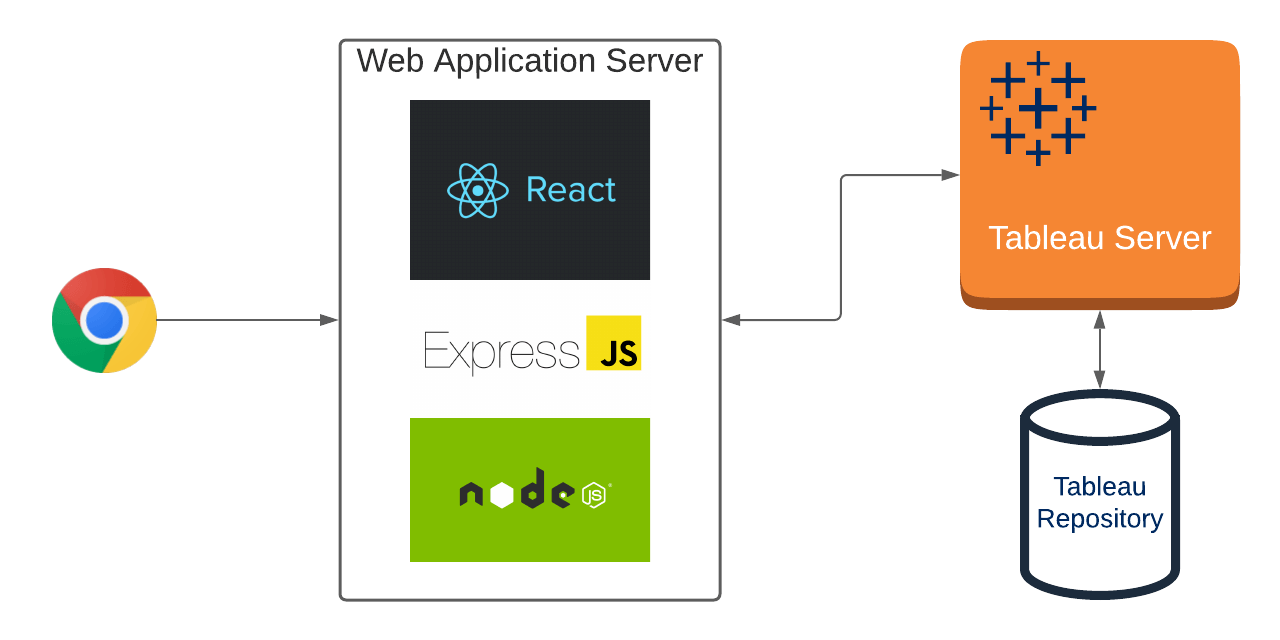
This web application leverages React.js for the frontend and Express.js & Node.js on the backend. Usually applications like this have a database to persist information, but we are simply pulling all needed data directly from Tableau Server.
Background and requirements
Tableau Server Requirements
This web app leverage’s Tableau Server’s REST API. This means you will need a Tableau Server to work with, and CORS must be enabled. If you’ve never enabled CORS before, it should be a simple TSM command:
tsm configuration set -k vizportal.rest_api.cors.enabled -v true

tsm configuration set -k vizportal.rest_api.cors.allow_origin -v <web-app-host-server>

tsm pending-changes apply
These commands will enable CORS and whitelist your web app’s URL as safe to use. If you are just trying this on your laptop, you can use http://localhost:3000 as the origin to allow.
Note that this configuration change will require restarting the Tableau Server.
Local Environment (your laptop) Requirements
You may need to install a few things on your laptop, in order to get started.
Git
This is optional, as it's only used to make downloading the source code easier. You can follow the instructions on https://git-scm.com/downloads to download and install for either windows/mac/linux.
Node / Yarn
Node is a JavaScript runtime that we're using to run the web app. Yarn is a package manager, which helps manage what dependencies are required for software projects. We need both of them in order to setup/run this web application.
Please follow the instructions for installing both Node and Yarn before continuing.
- Download the web app code
- Configure your Settings
- Publish ServerUsage Workbook to Tableau Server
- Start the Application
Open up Terminal (mac) or the Command Prompt (windows) and change the directory to wherever you want to save these files. Then use the commands below to download this web app's source code and move into that directory.
# Clone the repository

git clone https://github.com/takashibinns/tableau-sample-web-app

# Go inside the directory

cd tableau-sample-web-app
One of the files you just downloaded contains properties that tell the web app where to find your Tableau Server.
Open the src/server/config.js file and change the properties to match your server.
The most important thing is to change the server, landing page project, & admin user/password settings. This will make sure the app is properly leveraging your Tableau Server.
In order to get a user's usage data, a Tableau Workbook was created that makes queries against your Tableau Server's Postgres Repository. Open the included Tableau workbook (/server-usage/ServerUsage.twb) and change the connection settings to point to your Tableau Server. This is similar to how the admin views work within Tableau Server. You can find help getting this setup, by following the instructions here. When you publish this workbook make sure it's available to the tableau user specified in your config.js file. When this application loads it makes an API call to query for the data within this workbook, and those API calls are made under the context of the tableau user. To ensure security, the web app's logged-in user's id and the site id are passed as a filter parameters in the API call.
Depending on how large your user base is, you will likely want to switch this workbook's data source from a live connection to a Tableau Extract. This will reduce the query load on your Tableau Repository, and keep Tableau Server running smoothly.
Please note that the custom SQL provided in this workbook was developed using Tableau Server 2019.2, and different versions of Tableau Server may have slightly different schemas. If your workbook gives you a SQL error, you may need to adjust the custom SQL (found at server-usage/repository.sql) and replace the workbook's data source.
This document assumes the use of Yarn as the package manager, but it is possible to run with NPM (installed w/ node). From within this web app's directory, run the following commands depending on what you want to do. If just testing on your local laptop/workstation, run just the first 2 commands.
# Install dependencies
yarn (or npm install)


# Start development server
yarn dev (or npm run dev)


# Build for production
yarn build (or npm run build)


# Start production server
yarn start (or npm start)
Troubleshooting
If your Tableau Server is configured for SSO already (saml, sspi, etc) then you should get logged in automatically. If your Tableau Server is not configured for SSO, then you can enable Trusted Tickets via this config file.
This is turned off by default, so you may get prompted to login the first time you view a dashboard. However, you can enable SSO via Trusted Tickets in the config.js file’s useTrustedTicketSSO property. Just changing this value to true is not enough though, you will need to whitelist your web server’s IP address on the Tableau Server. More details on this topic can be found here.
Next steps
At this point, you should have a web app running in your browser with a login page. Enter your Tableau Server credentials to login, and you should start seeing some options for displaying Tableau Dashboards. Each thumbnail is also a hyperlink, so if you click on a dashboard’s image it will take you to the fully interactive dashboard embedded right into the app.
If you’re looking for more details on how each page works, check out the GitHub page below: https://github.com/takashibinns/tableau-sample-web-app
Last updated: September 13, 2021