Embedding API Tutorial (AngularJS) - Part 1
Part 1: Create basic AngularJS app and embed a tableau viz

Goal
More and more companies want to partner with Tableau to deliver analytics in their application and Tableau made it even easier for them with the new Embedding api v3. Version 3 introduces a new concept, web component. This is part 1 of a 3 part series, on how to use Tableau’s Embedding API with AngularJS. Part 1 will focus on creating an Angular web app from scratch and embed a Tableau dashboard into it. This will serve as the structure of our embedding app, and we’ll use it as a starting point for parts 2 and 3.
Background and Requirements
In order to complete this tutorial, you will need the following:
- Either Tableau Server (version 2021.4+) or Tableau Cloud
- If you don’t have a Tableau Server to develop against, you can always join the Tableau Developer Program, which gives you access to a free Tableau Cloud instance for use in development
- Admin rights to your Tableau Server/Cloud environment
- Install Angular CLI on your workstation
- Create a new Angular App
- Include the Tableau Embedding API Library
- Allow custom html tags
- Create a new component for rendering a tableau viz
- Verify it works
The first step is to create a basic Angular App. For this tutorial, we’ll use the name tableau-embed-angular but you can use whatever name you like.
ng new tableau-embed-angular --defaults
This will create the scaffolding for a new Angular app that uses CSS for styling and Angular routing. Once this process is complete, you will have a new directory containing your Angular app. In this directory, you will notice the "ng new" command created a bunch of new files. Change to its directory, and use "ng serve" to start it up.
cd tableau-embed-angular

ng serve --open
Running the ng serve command tells Angular to watch your source code, and re-build the Angular app if it detects any changes. The one thing to remember, is that it only takes into account code changes and NOT other ng commands. So if you leave ng serve running, but then run ng add or ng generate those changes won’t make it into the build. Just remember that if you run ng add or ng generate, you should stop and restart your ng serve process. Anyways, you should see a basic web page open in your browser, with some links to learn more about Angular. Most of what you see in this web app is coming from code in the src/app/ folder, so that’s where we want to start.
In order to embed any Tableau content, we’ll need to make a reference to the Tableau Embedding API. This consists of two parts: loading the library via a <script> tag and telling Angular to allow Tableau’s custom html tags.
Open /src/index.html and within the <head>, add a script tag that looks like this:
<script type="module" src="https://embedding.tableauusercontent.com/tableau.embedding.3.1.0.min.js"></script>
There are a few options for what the src of the script tag can be, check out our documentation for more details.
Angular tries to help us out by checking any HTML tags we add to our templates, so it will throw an exception if we just add the Tableau embed api’s <tableau-viz>
Line 1 should look like this:
import { NgModule } from '@angular/core';
Change it to
import { NgModule, CUSTOM_ELEMENTS_SCHEMA } from '@angular/core';
Within the @NgModule section, add a schema property and specify CUSTOM_ELEMENTS_SCHEMA as an item in its list.
@NgModule({
  declarations: [
    AppComponent
  ],
  imports: [
    BrowserModule
  ],
  providers: [],
  bootstrap: [AppComponent],
  schemas: [CUSTOM_ELEMENTS_SCHEMA]
})
Next, we need to create a component for rendering our Tableau dashboards. Stop the web server by using control-c, and then run the below command to create a new component named tableau-embedded-viz. Again you can use whatever name you like, but this tutorial will call it tableau-embedded-viz.
ng generate component tableau-embedded-viz
This will create a new directory under src/app/tableau-embedded-viz with a stylesheet, html template, & component typescript file. Lets start with tableau-embedded-viz.component.ts. The first line has some imports already, add another for Input
import { Component, OnInit, Input } from '@angular/core';
Within the export class, add 2 inputs for inheriting the divId and vizUrl from this component’s parent. This way, the component can be called from anywhere and passed in the URL for a Tableau dashboard.
export class TableauEmbeddedVizComponent implements OnInit {
  constructor() { }

  // Inherit attributes from the parent component
  @Input() dashboardIndex = 0;
  @Input() toolbar = 'hidden';
  @Input() vizUrl = '';

  // Dashboard properties
  public VizIndex = 'Tableau-Viz-' + this.dashboardIndex;

  ngOnInit(): void {
  }
}
Now we need to update tableau-embedded-viz.component.html to actually render the dashboard. There’s some placeholder HTML in here, so delete it all and then add the following:
<div class="tableau-wrapper">
    <div class="tableau-toolbar">
    </div>
    <div class="tableau-viz-container">
         <tableau-viz [id]="VizIndex" [src]="vizUrl"></tableau-viz>
    </div>
</div>
Really only the <tableau-viz>
Open up src/app/app.component.html and you should see the source code for the default angular app. We don’t need most of this so delete everything within
<div class=“content” role=“main”>
except for the footer and replace it with the following:
<app-tableau-embedded-viz divId="viz1" vizUrl="https://public.tableau.com/views/MeteoShowersRev1/Recap?:language=en-US&:display_count=n&:origin=viz_share_link"></app-tableau-embedded-viz>
<app-tableau-embedded-viz divId="viz2" vizUrl="https://public.tableau.com/views/Viz2educateLifeSpanofAnimals/Dashboard1?:language=en-US&:display_count=n&:origin=viz_share_link"></app-tableau-embedded-viz>
We picked some dashboards from Tableau Public, but really any dashboard URLs will work. Now we’re ready to test it out, so run the "ng serve —open" command and you should see two dashboards render within your web app.
Make it look prettier
OK so while this does actually render my Tableau dashboard, it doesn’t look very smooth. Let’s see if we can make it better.
The first thing you may have noticed is that the content is centered in the middle of the page, and there are some large spaces on each side of the dashboards. Let’s use CSS to make this look better. The app.component.html file actually has a large <style> tag, so lets move that code (everything within the <style></style> tags) into app.component.css. Also add in the below CSS to this file, to remove that extra white-space on each side of the content. We’ll need to update our component as well, in order to tell Tableau how much space (height & width) it has available.
.content {
  max-width: 90%;
}
Next run the following commands to add some libraries to this Angular app
ng add @angular/material
ng add @angular/flex-layout
By running the commands above, you will install Material Design for Angular and Flex layout. It will prompt you with some questions, just leave the defaults for now. Running "ng add" will make these modules available but does not add them to our app. So we need to add references to the modules we want to use (instead of every single material module) in our src/app/app.module.ts
Add the following imports at the top of the file:
import {FlexLayoutModule} from '@angular/flex-layout';
import {FormsModule, ReactiveFormsModule} from '@angular/forms';
import {MatToolbarModule} from '@angular/material/toolbar';
import {MatButtonModule} from '@angular/material/button';
import {MatCardModule} from '@angular/material/card';
import {MatBadgeModule} from '@angular/material/badge';
import {MatProgressSpinnerModule} from '@angular/material/progress-spinner';
import {MatIconModule} from '@angular/material/icon';
import {MatDialogModule} from '@angular/material/dialog';
import {MatGridListModule} from '@angular/material/grid-list';
Within the @NgModule’s imports list, include those modules as well
@NgModule({
  declarations: [
    AppComponent,
    TableauEmbeddedVizComponent
  ],
  imports: [
    BrowserModule,
    BrowserAnimationsModule,
    FlexLayoutModule,
    FormsModule,
    ReactiveFormsModule,
    MatToolbarModule,
    MatButtonModule,
    MatCardModule,
    MatBadgeModule,
    MatProgressSpinnerModule,
    MatIconModule,
    MatDialogModule,
    MatGridListModule
 ],
 providers: [],
 bootstrap: [AppComponent],
 schemas: [CUSTOM_ELEMENTS_SCHEMA]
})
Now we can go to our tableau-embedded-viz component and start using these modules. First thing we should modify is tableau-embedded-viz.component.ts.
Currently the dashboard is visible, but it’s not responsive. Let’s add some code to make the Tableau dashboard adjust itself based on how wide the browser is. Add the following code within the TableauEmbeddedVizComponent class:
// Handle dashboard resizing
public getScreenWidth: any;
public getScreenHeight: any;
private calculateDashboardSize = () => {
  const bufferSize = 25;
  this.getScreenWidth = window.innerWidth-bufferSize;
  this.getScreenHeight = (window.innerWidth-bufferSize)*3/4;
}
@HostListener('window:resize', ['$event'])
onWindowResize() {
  this.calculateDashboardSize();
}
You will also need to change line 1 from
import { Component, OnInit, Input } from '@angular/core';
to
import { Component, OnInit, Input, HostListener } from '@angular/core';
Since we want this to run when the component is loaded (and not just after the browser window resized), add this line within the ngOnInit() method:
this.calculateDashboardSize();
We need to tell the Tableau viz how much space it has, so edit the <tableau-viz> tag in tableau-embedded-viz.component.html to use our new methods.
<tableau-viz [id]="VizIndex" [src]="vizUrl" width="{{getScreenWidth}}" height="{{getScreenHeight}}" toolbar="{{toolbar}}"></tableau-viz>
Next, we’ll add some public properties for a toolbar. This can be added anywhere in the TableauEmbeddedVizComponent class, but I like to keep all the public properties together at the top.
public isFavorite = false;
public dashboardName = '';
public viewIsFavorite = "favorite_border"
public thisViz: any;
These properties can be referenced in the component’s HTML, but we also want to do something when users click on buttons in the toolbar. Let’s also add some code to handle these click events (within TableauEmbeddedVizComponent).
// Run after the component has been rendered
ngAfterViewInit() {

  // Define a function that can be run, on
  let viz = document.getElementById(this.VizIndex);
  if (viz) {
    // Add event handler to trigger once the viz is finished loading
    viz.addEventListener("firstinteractive", async (event) => {
      // Need to cast the HtmlElement to an object (for TypeScript)
      this.thisViz = <any>viz;
      // Update the name and attributes of this dashboard
      this.dashboardName = this.thisViz.workbook.activeSheet.name;
    });
   }
 }

// Method to update the icon, after a status change
private setFavoriteIcon = (isFavorite:boolean) => {
  this.isFavorite = isFavorite;
  this.viewIsFavorite = isFavorite ? "favorite" : "favorite_border"
}

// Method to determine if the current viz is a favorite
private getFavorite = (vizId:string) => {
  // Business logic goes here
}

// Method to update the dashboard's favorite status
public setFavorite = (isFavorite:boolean) =>{
  // Business logic goes here
}

// Method to reset the dashboard filters
public resetFilters = () => {
  // Use the Embeding API to revert all filter changes
  this.thisViz.revertAllAsync()
}

// Method to download the dashboard as a PDF
public downloadPdf = () => {
  // Business logic goes here
}

// Open a modal window with more details of the workbook
public openDialog = () => {
  // Business Logic goes here
}

// Close out of this page
public closeDashboard = () => {
  // Business Logic goes here
}
This code snippet does a few things. First, it waits until the component has been initialized and then adds an event handler to the Tableau viz with a callback function. This saves a reference to the Viz object, and uses that to extract some information (dashboard name). Second, some public and private methods are defined that will trigger some code to run when users interact with the toolbar. Notice the resetFilters method calls revertAllAsync, which is defined in the Tableau Embedding API.Now let’s add that toolbar to tableau-embedded-viz.component.html. Insert the below HTML code within the tableau-toolbar div container, we’ll use this to show a toolbar with some buttons and labels.
<mat-toolbar>
   <img class="tableau-icon" src="./../../assets/tableau-icon.png" />
   <span>{{dashboardName}}</span>
   <span class="example-spacer"></span>
   <button mat-icon-button class="example-icon favorite-icon" aria-label="Example icon-button with heart icon" (click)="setFavorite(isFavorite)">
       <mat-icon>{{viewIsFavorite}}</mat-icon>
   </button>
   <button mat-icon-button class="example-icon" aria-label="Reset the dashboard" (click)="resetFilters()">
       <mat-icon>undo</mat-icon>
   </button>
   <button mat-icon-button class="example-icon" aria-label="Download PDF" (click)="downloadPdf()">
       <mat-icon>cloud_download</mat-icon>
   </button>
   <button mat-icon-button class="example-icon" aria-label="Information about the dashboard" (click)="openDialog()">
       <mat-icon>info</mat-icon>
   </button>
   <button mat-icon-button class="example-icon" aria-label="Back button" (click)="closeDashboard()">
       <mat-icon>cancel</mat-icon>
   </button>
</mat-toolbar>
This makes a reference to tableau-icon.png, which you can download from here and then copy to tableau-embed-angular/src/assets/tableau-icon.png.Next, let’s add some CSS to tableau-embedded-viz.component.css to make things look better:
.example-spacer {
  flex: 1 1 auto;
}

img.tableau-icon {
  height: 2em;
  padding-right: 1em;
}
One of the buttons on the toolbar is an Info icon, let’s make it so when a user clicks on this button it pops up a modal window with some more details about the dashboard. This means our openDialog method needs to trigger the popup with the details of the dashboard object. Since the Angular app is using typescript, that means we should define an interface that outlines exactly what properties a Tableau dashboard object will have. We’ll probably re-use this across several components, so create a new file at tableau-embed-angular/src/app/common/models/tableau-dashboard.ts and copy this following code to it.
/* Tableau Dashboard object, as returned by REST API */
export interface TableauDashboard {
    id:string,
    name:string,preview: string,
    viewUrlName: string,
    createdAt: Date,
    updatedAt: Date,
    isFavorite: boolean,
    usage: {
      totalViewCount: number
    },
    owner: {
     id: string,
     email: string,
     fullName: string
    },
    workbook: {
     id: string,
     name: string,
     description: string,
     contentUrl: string
    }
}
In order for our TableauEmbedVizComponent to use this, we just need an import that references it. We will also need to import dialog box components from Angular Material. At the top of tableau-embedded-viz.component.ts, add the following imports:
import { Inject } from '@angular/core';
import { MatDialog, MAT_DIALOG_DATA } from '@angular/material/dialog';
import { TableauDashboard } from '../common/models/tableau-dashboard';
Now in our openDialog method, we can create a new TableauDashboard object. Eventually we’ll get the data from a REST API call, but we can at least create a placeholder object.
// Open a modal window with more details of the workbook
  openDialog() {
    // Create a placeholder dashboard object
    const dash = {
     updatedAt: new Date(),
     workbook : {
       id: '',
       contentUrl: '',
       name: 'Some Workbook',
       description: 'some description'
    },
    owner: {
      id: '',
      email: '',
      fullName: 'Me'
    }
  } as TableauDashboard;
}
We also need another component for the popup itself. We could use the ng generate component command, but since this is a simple popup we can just add the component code to the bottom of this file (outside of the TableauEmbeddedVizComponent class).
// Declare the component for providing more details via a modal window
@Component({
  selector: 'app-tableau-embedded-viz-details',
  templateUrl: 'tableau-embedded-viz-details.component.html',
})
export class TableauEmbeddedVizComponentDialog {
  constructor(@Inject(MAT_DIALOG_DATA) public data: TableauDashboard) {}
}
Now that our component is defined, we can tell TableauEmbeddedVizComponent how to pop it up. First find the constructor within this class, and replace the empty constructor method with this:
constructor(public dialog: MatDialog){}
Then in the openDialog method, add the below code to popup the modal window.
// Open the popup
this.dialog.open(TableauEmbeddedVizComponentDialog, {
   minWidth: 350,
   data: dash
});
This makes a reference to tableau-embedded-viz-details.component.html so create a new file with that name and copy/paste the code below.
<h2 mat-dialog-title>{{data.workbook.name}}</h2>
<mat-dialog-content class="mat-typography">
  <p>Created by {{data.owner.fullName}} ({{data.updatedAt}}) </p>
  <h3 style="text-decoration: underline;">Description</h3>
  <p>{{data.workbook.description}}</p>
</mat-dialog-content>
<mat-dialog-actions align="end">
  <button mat-button mat-dialog-close>Close</button>
</mat-dialog-actions>
One side affect of manually creating the component, is that our Angular app doesn’t know about it yet. Open src/app/app.module.ts and you’ll see a reference to TableauEmbeddedVizComponent as an import and in @NgModule.declarations. We’ll need to manually add our new component to these places as well.
import { TableauEmbeddedVizComponentDialog } from './tableau-embedded-viz/tableau-embedded-viz.component';
declarations: [AppComponent,TableauEmbeddedVizComponent,TableauEmbeddedVizComponentDialog],
You should now have a web app that looks like this:
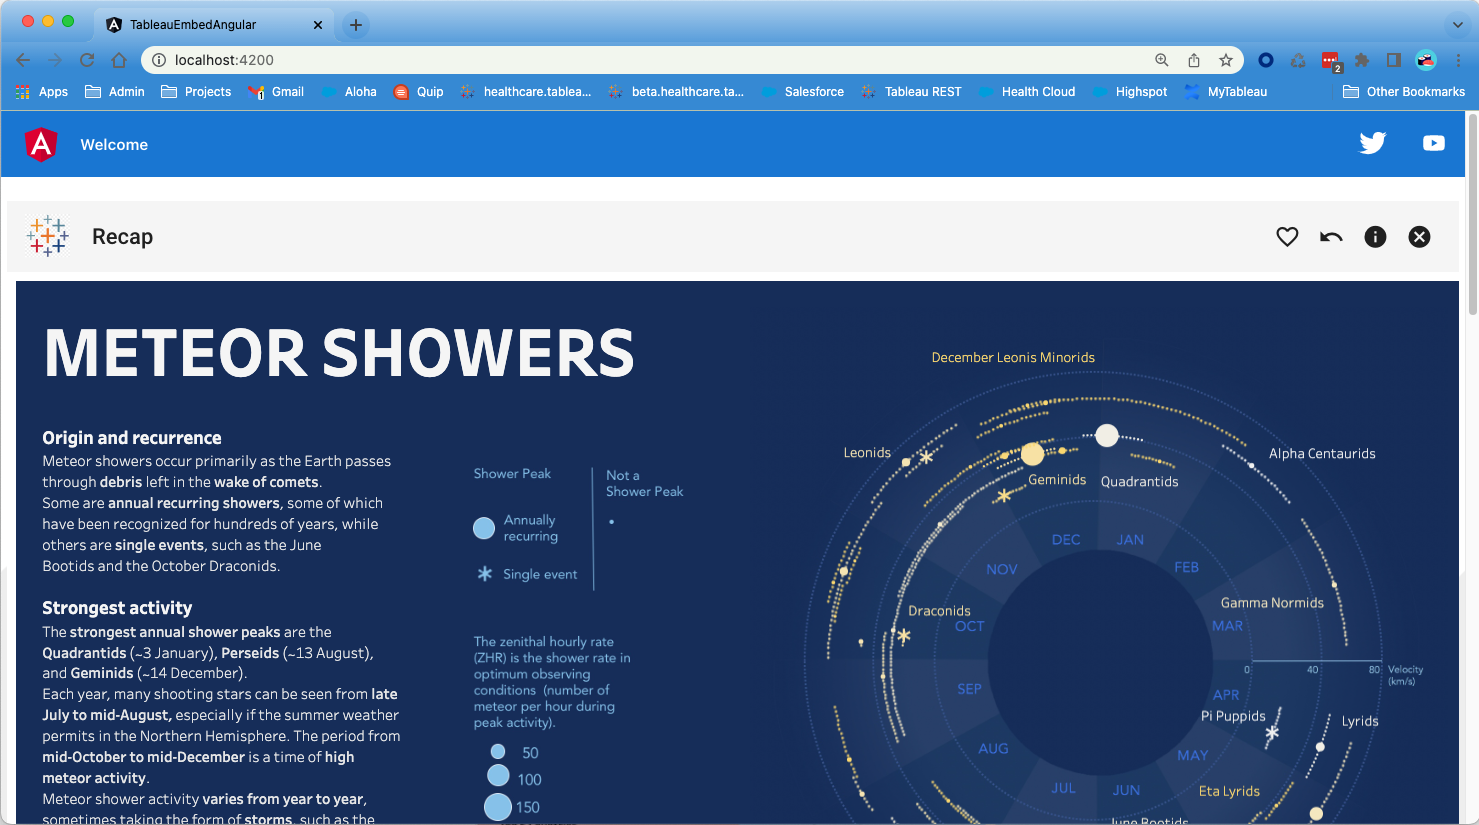
The toolbar above the dashboard is populating the dashboard’s title dynamically. Also, if you make any filter selections in the dashboard, the Undo button in the toolbar will reset the dashboard to its original state. Last, we have an Info icon in the toolbar that will show a popup with some more details about the dashboard. We’ve populated this with some placeholder values, but part 3 of the tutorial will fetch this data automatically.
Source code for Part 1 of this tutorial can be found in GitHub.
Troubleshooting
If you kept ng serve running the whole time during development, you might notice the flex-layout and material design modules don’t seem to look the same as the screenshots from this guide. Whenever you add modules using ng add or ng generate, you should stop the ng serve process and then restart it when your ng command is complete. This will rebuild the Angular app and include the new modules.Additionally, if you chose a different theme when installing @angular/material the material design modules should look different. They should still function just fine, but the coloring/styling of those modules is defined in the theme and this guide used the default theme (Indigo/Pink)
If you kept ng serve running while adding that last Dialog component, you may see an error that looks like this:
Error: src/app/app.module.ts:22:5 - error NG6001: The class 'TableauEmbeddedVizComponentDialog' is listed in the declarations of the NgModule 'AppModule', but is not a directive, a component, or a pipe. Either remove it from the NgModule's declarations, or add an appropriate Angular decorator.
You just have to stop the ng serve process and start it back up again to get past this.
Does your dashboard seem to have a size of it’s own, and doesn’t expand to fill the entire space? This could be attributed to how the dashboard was created in Tableau. Check out the Tableau documentation on defining dashboard layouts, to get a better idea of how the dashboard could have been designed. If you’re not sure how a specific dashboard was designed, you can add the following line of code to the viz event handler within ngAfterViewInit()
console.log(`dashboard size: ${JSON.stringify(this.thisViz.workbook.activeSheet.size)}`)
This will print a JSON object describing the layout specified in the Tableau dashboard.
Next Steps
This example used dashboards from Tableau public, because they do not require any authentication. However, almost all embedded use cases will require single sign on from the web app → Tableau. If you want to learn how to setup single sign on between your web app and Tableau Server/Cloud, check out part 2 of this series: Using Connected Apps for embedded single sign on (SSO) to Tableau Server/Cloud.
All source code from part 1 of this tutorial series can be found in Github. In part 2 of this series, you'll learn how to add an authentication layer. In part 3, you'll use Tableau's REST API to provide a richer UX.
上次更新: 8月15日