Flights of the World Part II: How to map great circle routes in the newest Tableau release
You may have heard that we recently released a new version of Tableau—and we have some exciting news for anyone and everyone working with maps in Tableau. We introduced a change in how lines and polygon edges are rendered, making it much easier to generate great circle routes!
Great circle: A great circle route is the shortest distance between two points on the surface of the earth.
A while back on the Tableau Public blog, Florian Ramseger and I demonstrated how to use a Python script to convert a file of latitude and longitude pairs for airline flight routes into great circle line strings that show the curved, shortest path between two points on the globe. But adding Python to the data processing workflow isn’t everyone’s idea of fun.
Let's walk through an example of how this workflow has evolved with Tableau 2018.2. Just like in the original example, we will make a Keyhole Markup Language (KML) file, but this time we can do almost all the work in Tableau Prep or in Excel.
1. Download the data
As in the original example, we will use the OpenFlights Database with information about all the airports, airlines, and flight routes of the world. We can download this information as text files (.dat files) and open it in Tableau.
While you could quickly generate flight route maps with straight line connecters using the datasets from the OpenFlights Database, these straight lines aren’t a good reflection of the actual path between the airports. A straight line on the map isn’t the shortest path on the globe. To see the shortest path on the globe, we want curved lines representing great circle arcs.

Enter the new and improved spatial file rendering in Tableau 2018.2. Now lines and edges will be rendered according to the semantics of the data source. For some data sources (e.g., SQL Server geographies and KML files), any line connecting two points is intended to be interpreted as a great elliptic arc. This is the shortest path on a sphere versus the great elliptic arc being the shortest path on a spheroid. But it is so close that you won’t notice a visual difference.
What does this mean? It means that for any KML LineString with two points, Tableau will render that line as the shortest path, a great elliptic arc! So, we can quickly convert data (e.g., from the OpenFlights Database) to make a map that looks like this:

2. Create a KML with great elliptic arcs
Learning the basics of KML files
KML is a file format for spatial data. It is really just a text file with an XML structure. The trickiest part about writing your own KML files is that the XML tags are case-sensitive and have to appear exactly as shown in the Google KML reference. For creating our flight path KML file, we only need a few tags.
- The header – All KML files start out with a header that defines them as a KML file:

- The spatial data & corresponding attributes – For our flight paths, we just need LineStrings. Our final file will have one LineString for each path.
Each LineString is considered a separate Placemark. Each Placemark can have two attributes: description and name. For each of the tags in the Placemark, there is an opening tag and a closing tag. The closing tag has a ‘/’ before the tag name.
Here is an example of a single LineString:

- The end – Just like how the Placemarks needed opening and closing tags, the whole KML file needs a closing tag. That is just a
 at the end that closes the
 tag we created in the header.
Putting that all together, here is an example of a simple, one LineString KML file showing the path between the Los Angeles airport (LAX) and London-Heathrow (LHR):

When added to Tableau, this file looks like:

To add more LineStrings, you just need to add additional  after the first one, and before the closing
  at the end of the file.
3. Convert the flight routes and airport locations into KML LineStrings
Now we just need to convert the flight routes and airport locations collected from OpenFlights into KML LineStrings so that we can add them into a single KML file. The easiest way to do this is by using Tableau Prep. Another way to do this is with the Concatenate function in Excel (click here to skip ahead). We’ll show you both in the following paragraphs. If you want to just jump ahead and explore, all of our input and output files are available here for reference.
Flight routes: the Prep way

Step 1: Join the raw data files in Prep

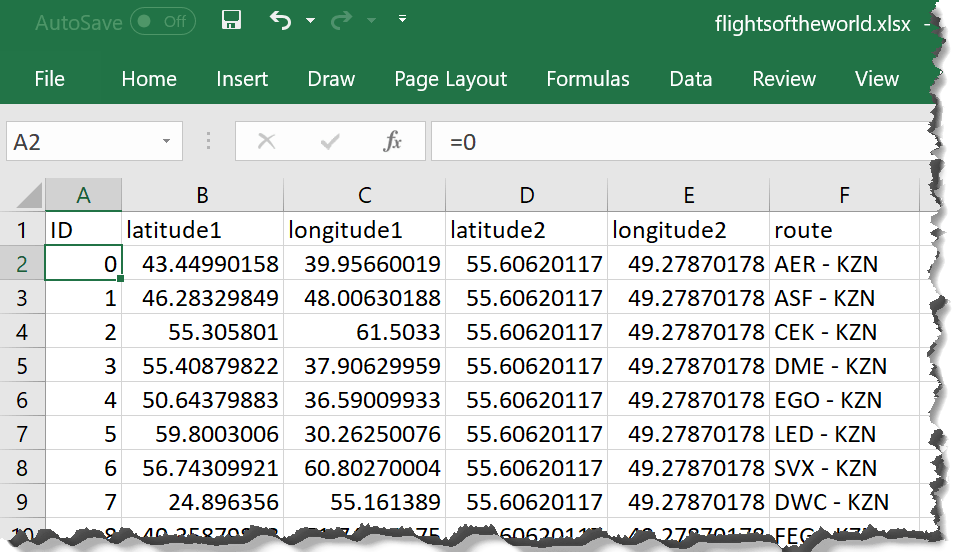
The OpenFlights data comes in multiple files: one file containing the airport data (airports.dat), including the latitude and longitude, and a second file contains the route information (routes.dat).
For instance, in the examples below, you can see the airports.dat file showing the location details for the Seattle Tacoma International Airport (IATA code of “SEA”), while the routes.dat file provides details on the connections between airports. The second table shows that Lufthansa (airline code “LH”) has a non-stop connection between Seattle and Frankfurt.

By joining both of these tables together, we can identify the start and end locations for each route. These locations will be used to generate the KML file with our great circle flight paths.
In order to generate the flight paths we will have to perform two joins on the route data, once using the source airport, and once using the destination airport. We use the ID columns to join the tables instead of the IATA codes, although the latter should also work. After each join, we add a step to re-name the Latitude and Longitude fields so that it is clear if they are for the Origin or the Destination airport:

This gives us a result table where each row in the table represents a single route with location details for both the origin and destination airports.
Step 2: Create unique identifier for each route

Our next step is to add a new column with a unique identifier for each route. We’ll create a simple calculated field that combines the route origin and destination into a single string:
[Source Airport] + “-“ + [Destination Airport]

Step 3: Create KML Placemarks and clean up the table

Now we have all of the information needed to create a KML Placemark. We can do this with another calculated field that will write out a KML LineString for each route:


Once we have the KML LineStrings calculated, we can remove the extra fields of data. All we need in the end is the KML LineString column.
Step 4: Aggregate to remove duplicates (optional)

Now we can aggregate to remove duplicate routes (e.g., some routes have multiple rows in the table).
The aggregation step will simplify the final KML file, but it isn’t required. For instance, you might want to leave all of the duplicates in the table in order to color encode each route in Tableau based on number of flight records.

Step 5: Add the KML file heading and closing text, and output the result

Once the table is simplified, we just need to union on the KML header, then add the KML closing () tag, and remove the extra fields from the table. We have to have the additional step to remove the extra fields, because the union step adds in a table name column.

Finally, we export the result table. Unfortunately, as of today, Tableau Prep can’t output KML documents, so we need to do a tiny bit of manual massage to the output we just generated to turn it into valid KML. There are four steps:
- Export the table as a CSV file.
- Open the file in a text editor and remove the header line (this is the column name that you provided when you created your KML LineStrings).
- Remove all double quotes from the file. Make sure to use your text editor’s Find & Replace function to speed up the process and make sure you get all of the quotes.
- Rename the file and replace the .csv file extension with .kml. This will tell Tableau to treat it as a spatial data source.

The final file will look something like this:

Step 6: Play in Tableau
Now all you have to do is add your new KML file to Tableau 2018.2 and play!

Flight routes: the Excel way
Another way to create the KML file is using a spreadsheet. While we use Microsoft Excel for our data preparation, but many other spreadsheet software will have similar capabilities. You just need a program that allows you to easily concatenate columns.

Step 1: Use Concatenate to create a Placemark for each row
In Column G of the provided datasets (to the immediate right of the last column of data shown above), we just need to add a formula to write out a Placemark string for the first row. It may look complicated, but it’s really fairly straight forward once you know how it works. The formula we’ll use is:

This writes out one Placemark, with a name, description, and start / end coordinates. To show how it lines up with the KML Placemark description that we looked at earlier, take a look at the same formula reformatted slightly. The bold text in the Excel Concatenate function just point to the values that we want to grab from the Excel file (e.g., F2 = Column F, Row 2)

Copy and paste the formula to all of the remaining cells in that row. The easiest way to do this is to copy the function, then select all of the remaining cells in the column and paste.
You should end up with a table that looks like this – the new column is shown with the red arrow:

Step 2: Copy / Paste into a text editor to make the KML file
Now we just have to take these new Placemark text strings and drop them into a KML file.
You can use any text editor (e.g., Notepad, Sublime, etc.) to make your KML file. You just need to add in the two line header at the start of the file:

Then paste in all of your Placemarks (it’s fine if they are each one line – no need to separate out the individual parts of each placemark onto separate lines), and finally add the closing at the end of the KML file:

Save the file and give it the file extension .kml. If you set the file type to “All Files (*.*)” you should just need to type .kml at the end of your file name.

Step 3: Play in Tableau
Now all you have to do is add your new KML file to Tableau 2018.2 and play!
Either of these methods to create a KML file should work for making any great circle routes that you want to drop into Tableau 2018.2! You can download the newest version of Tableau here.


