An Introduction to Hyper API


We recently released our first stable version of Hyper API, which allows you to create, update, and read Tableau extract files programmatically. It is the spiritual successor of our Extract API 2.0, which is now deprecated. However, it can do way more than Extract API 2.0! Join me on this little journey through our new API.
Hyper API in a Nutshell
Hyper API is our library for working with local .hyper files (aka extracts) in all conceivable ways: You can create them, insert data into them, update, delete, or read that data. Hyper is Tableau’s SQL-based relational database engine and .hyper files are in fact relational databases. Hyper API harnesses Hyper to grant you direct SQL access to your .hyper files! If you are familiar with SQL, this will probably sound like Christmas to you. If you are not, don’t fear: We have added auxiliary classes for the most common tasks, so you don’t need to know any SQL for them. Just use the intuitive classes; they will create and issue the SQL commands under the hood.
How to Get Hyper API
Hyper API is available as a library in four different languages (Python, C++, Java, and .NET) for three platforms (Windows, Linux, and MacOS). Note that you need to pick the right platform even for platform independent languages, as the API includes Hyper itself and the API core, which are OS-dependent binaries. All flavors are available at our download page.
.hyper Files — aka Databases
Before I start explaining how the API works, we first need some basic understanding and terminology of .hyper files. Commonly, these files are called extracts, as they are created when you switch your Tableau connection from live to extract and they contain the extracted data. The first thing to note is that a .hyper file coming from Tableau only stores the data; either denormalized as a single table or normalized as a multi table extract. The file does not store the join tree you defined in Tableau or information about the connection you used to get the data. The join tree is stored in your workbook (.twb file), connection information is stored in a datasource (.tds file). Tableau also offers you to zip all these files together into a .twbx file, so if you wonder where the extract of your workbook is in case you have a .twbx file, open that file with a zip utility and you will find the .hyper file in it.
.hyper Files only store relational data, aka tables. They don’t store information about the connection you used to get the data or your join tree in Tableau.
However, a .hyper file isn’t limited to just being the storage file for extracted data, it is rather a fully-fledged Hyper SQL database. Therefore, I will just use the term database or database file here; keep in mind, it is equivalent to the terms “.hyper file” and “extract”.

The figure above shows three database files. Let’s start with the left example, showing the general structure of a Hyper database: It consists of schemas, which group tables under a common namespace. In the example, there are two schemas: schema X containing two tables A and B and schema Y containing one table C. Databases can have an unlimited amount of schemas, and each schema can have an unlimited amount of tables.
The middle database in the figure shows the structure of a single table extract created with Tableau. It contains a single schema Extract with a table that is also named Extract in it. If you create a multi table extract, it will also contain a schema Extract with multiple tables in it, which are named as they are named in Tableau. Names are case sensitive in Hyper, so take special notice of the uppercase E in Extract.
Finally, the right side of the figure shows a database that has been freshly created with the Hyper API: It contains an empty schema called public. If you wonder why the schema is named that way, the answer is: because PostgreSQL also calls the default schema that way. Due to its widespread usage, a lot of people working with databases already know how to work with PostgreSQL, so Hyper tries to mimic PostgreSQL wherever feasible to ease the transition for as many people as possible. For example, Hyper’s SQL dialect also mostly matches the one of PostgreSQL.
API Structure
All languages share a common architecture which can be summed up as follows:
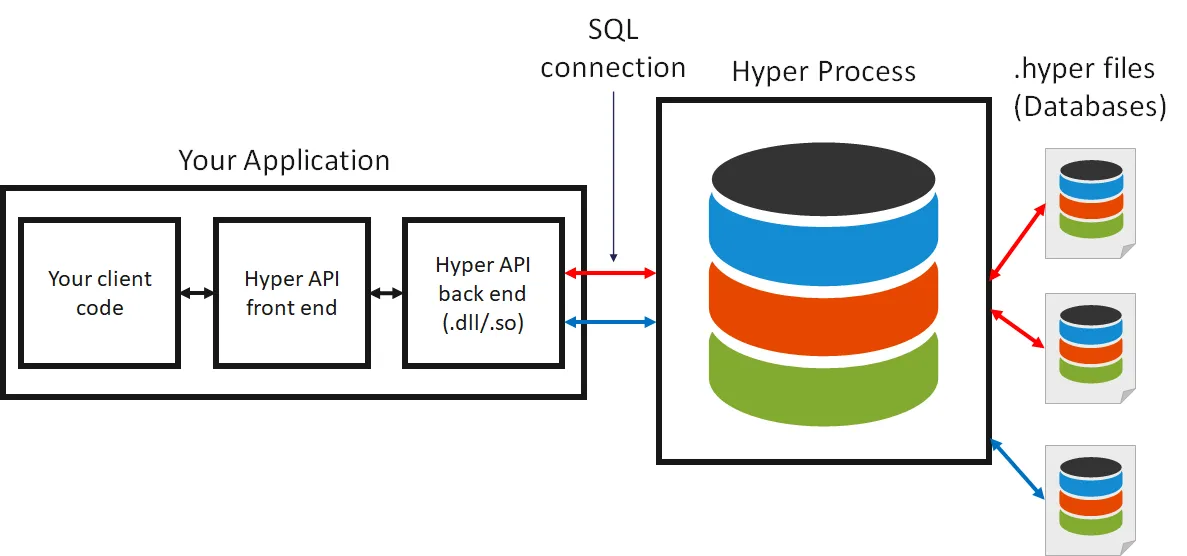
The API methods are exposed in a library in the respective language (“Hyper API front end”) but this library is just a thin wrapper around a shared library (“Hyper API back end”). The API back end communicates through SQL with a Hyper server (“hyperd”) and this server operates on .hyper files. Note that while this is indeed a client/server architecture, it is a local one: The API spins up and tears down the Hyper server itself and the server is on the same machine as the API. Currently, we don’t allow connecting to a remote Hyper server but only to the servers that were spun up by using the API itself.
The first thing to do when using the API is to start an instance of the Hyper server. There is a class for doing so, called HyperProcess, which is very simple to use. Its lifetime determines the lifetime of the Hyper instance: Once you create an object of this class, it creates an instance; when you dispose of it, the instance is terminated. While you could spin up multiple instances by instantiating multiple HyperProcess objects, you should never do this, as they will contend for your machine’s resources; instead, one instance is enough to service all requests, even if you connect to it with multiple threads.
After having created an instance, you can connect to it using the Connection class. You can have multiple connections to Hyper at the same time, and each connection can be attached to an arbitrary number of databases. However, having two connections to the same database at the same time is not possible. In the figure, the red connection is attached to two databases, while the blue one is attached to just one.
Creating and Accessing a Database
Enough of the grey theory now, let’s look at some code! I will only show Python code, but note that the API is very similar in the other languages. Here is the obligatory “Hello World” example depicting how to spin up a hyper instance, connect to it, and do something with the connection
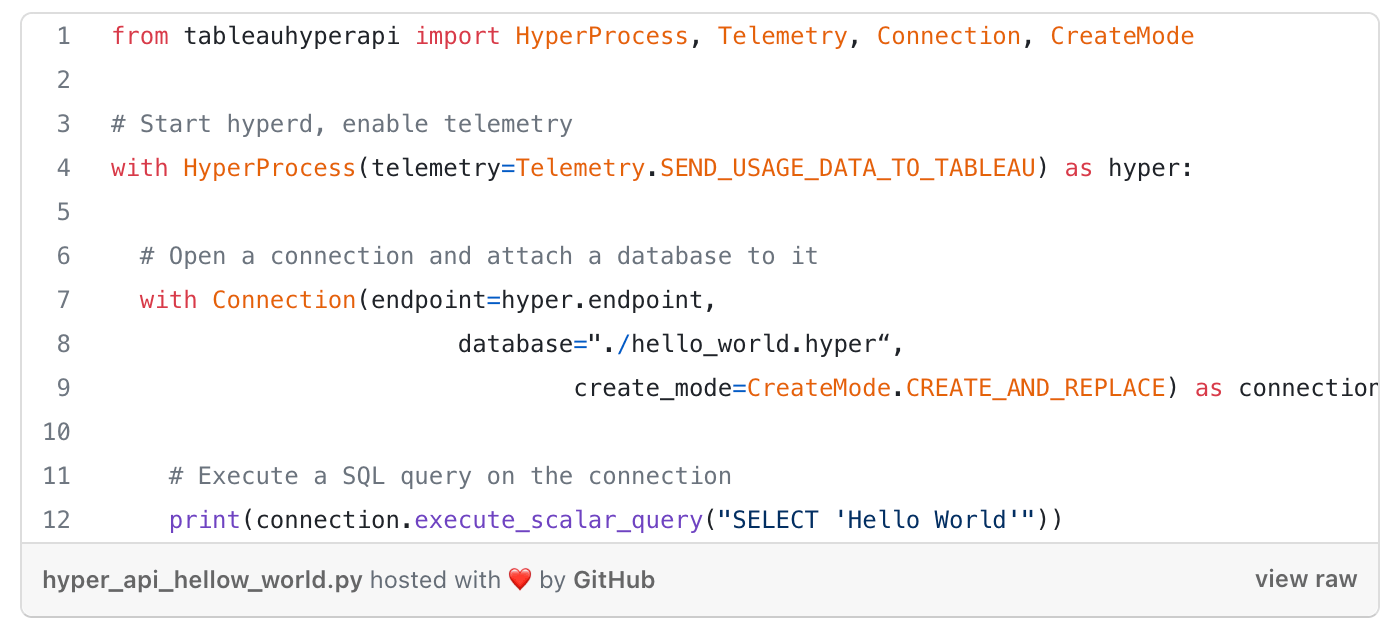
Note how the HyperProcess and the Connection object are created using the with statement. This statement makes sure that we have exact control over the lifetime of the object, which is important, as the disposal of the objects has important side effects. For HyperProcess, the disposal will trigger the shutdown of the Hyper process. For Connection, the disposal will trigger that all changes will be written to the database file. Thus, if you ever find that a Hyper file doesn’t contain the data you just inserted into it, the culprit might be that the connection to that file hasn’t been closed, yet.
Always use with statements (or the respective concept in other languages, such as try-with-resource in Java, the using statement in C#, or stack variables with explicit scopes in C++) for the objects in the API that require explicit lifetime management (HyperProcess, Connection, Inserter, and Result) to make sure that they get disposed of at the right point in time. Forgetting to dispose of such an object is a common source of errors.
The changes made to a Hyper database are only guaranteed to be in the file once the connection to that file is closed successfully. If you made any changes to a database and your program terminates abnormally before the connection closes, the database file may be corrupt and thus should be re-created. There is currently no recoverability in case of an error, so you should not use Hyper database files as the only means to store important data that cannot be recovered from elsewhere.
Also notice in the example that the HyperProcess constructor takes a telemetry parameter, which allows you to control whether Hyper will send usage data to Tableau. If you want to help us make Hyper better in the future, please enable this. We will never send any of your data, so you don’t need to worry about privacy issues. We will just send usage statistics to better understand the workloads people have so that we can tweak the right parts of Hyper.
Next, let’s have a look at the Connection constructor. Besides the endpoint of the Hyper server, we pass in a database file path and a CreateMode. This will instruct the API to automatically create or replace the database file and attach it to the connection. With a different create mode, we could also just create the file in case it doesn’t exist or don’t create the file but rather fail if it doesn’t exist.
Creating a Table and Inserting Data
Now that we know how to create and access a database file, let’s put some data into it. For this basic use case, we don’t need SQL, as there are classes that will generate the SQL under the hood (though we could also use raw SQL if we preferred). First, we have to define the schema of the table we want to create using the TableDefinition class:
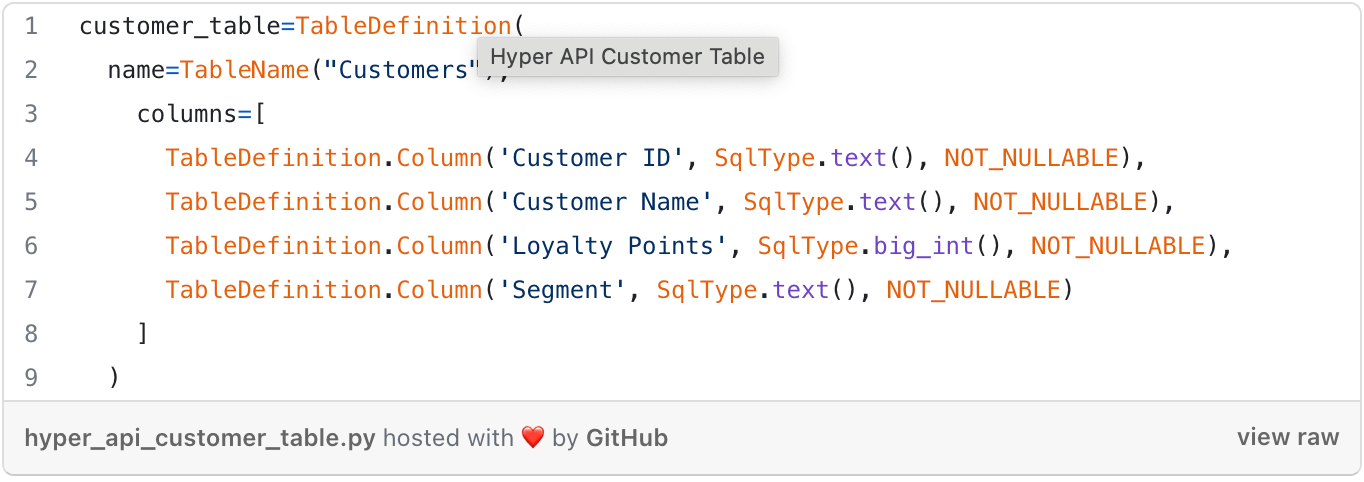
The definition is straightforward: we just need to specify the name of the table and its columns. Note that we didn’t specify a schema in the table name. If no schema is specified, Hyper will use the “public” schema. Thus TableName("Customers") is equivalent to TableName("public", "Customers").
Any table that is not explicitly prefixed with a schema is treated to be in the “public” schema.
For each column, we give its name, its data type, and whether it can contain nulls (NULLABLE) or not (NOT_NULLABLE). In the example, we create three columns of type text and one column of type big_int. The following data types are available:
text()— string valuebool()— boolean valuesmall_int()— signed 2-byte integerint()— signed 4-byte integerbig_int()— signed 8-byte integerdouble()— double precision floating point numbernumeric(p,s)— fixed point numeric with p digits overall, of which&sare fraction digits (limits: p < 19, s <= p)date— date valuetime— time valuetimestamp— timestamp (combined date and time)interval— time intervalbytesraw binary data
Now that we have defined the table, we can tell Hyper to create it. We use the Catalog class for this task, which has methods for querying or altering the metadata of a database. The following line will create the table:
connection.catalog.create_table(customer_table)
Now that we have created the table, we can use the Inserter class to get data into it:
withInserter(connection, customer_table) as inserter:
inserter.add_row(["DK-13375", "Dennis Kane", 518, "Consumer"])
inserter.add_row(["EB-13705", "Ed Braxton", 815, "Corporate"])
inserter.execute()
As you can see, the insertion is straightforward as well. We create an Inserter object stating the table we want to insert into and then call add_row repeatedly for each row we want to insert. Finally we call execute to commit the insert into the database. Note that the whole insertion is atomic: Once execute returns successfully all rows that were added will be in the database (but note that you still need to close the connection to avoid possible data corruption!). If the execute call throws an exception or you don’t call execute, no data will be inserted. Note that the inserter can no longer be used after calling execute; create a new inserter if you want to insert more data afterwards
Remember to call execute() on an Inserter after adding all rows. If you wonder why an insert seemingly doesn’t insert any data, it is probably because you forgot to call execute().
Also note that again we use the with statement for the inserter object. The reason for this is that the object keeps the connection busy, so the connection cannot be used otherwise. If you forget to close the inserter and try to use the connection for other purposes afterwards an exception will be raised.<
You can also insert data into a table that already contains rows. In this case, the data will just be appended to the table.
Table creation and data insertion covers the basic “extract creation” scenario of the API. For the Tableau SDK and the Extract API 2.0, this was the only scenario that was available. With Hyper API, we’re just getting started, as we can harness the full power of SQL.
Executing SQL
The basic mechanism for executing SQL queries was already covered in the “Hello World” example:
# Execute a SQL query on the connection print(connection.execute_scalar_query("SELECT 'Hello World'"))
The Connection class features four methods to execute SQL, which differ by what they return:
- a href="https://help.tableau.com/current/api/hyper_api/en-us/reference/py/table…" target="_blank"
execute_query:Executes a SQL query and returns the result as a Result object. The preferred methods for queries with a potentially large result. Note that the Result object must be closed before the connection can be reused again, so use it in a with statement. execute_list_query: Executes a SQL query and returns the result as a list of lists representing the rows and columns of values, respectively. This method is only available in Python. It is not recommended for large results or when performance is of utmost importance, as building the list of lists requires having all objects in memory at the same time and is just a slow operation in general.execute_scalar_query: Executes a scalar SQL query, that is, a query that returns exactly one value. If more or less values are returned, the method will raise an exception. The method returns the single value directly.execute_command: Executes a SQL command. Does not return a result but just a single integer stating the number of altered rows, if the command alters rows. For example, if the issued command is a DELETE or UPDATE statement, the method will return the number of deleted or updated rows, respectively. The method can be used for any kind of SQL command, if you are not interested in any results.
To read and print the contents of our “Customers” table, you could use the following query:
print(connection.execute_list_query(

   f"SELECT * FROM {TableName('Customers')}")

)
While this is the easiest solution, we might not want to have the whole result in memory or use another programming language where execute_list_query is not available. In this case, we can use execute_query as follows:
with connection.execute_query(

   f"SELECT * FROM {TableName('Customers')}"

) as result:

  for row in result:

    print(row) # Print whole row

    print(row.get_value(0)) # Print value in first column
Here, we can iterate over the rows in the result one by one. This is more efficient than building a big list of lists, but it is also less convenient, as we can read each row only once in the order in which it arrives; iterating over the result a second time will raise an exception.
Again, make sure to use a with statement for the result variable, because the result will block the connection as long as it is still open. Thus, if you forget the with statement and try to use the connection afterwards, you will receive an exception stating that the connection is still busy.
Note that we have used a formatted string literal to insert the name of the table in these examples. The expression we evaluate as a table name is TableName('Customers'), which is the constructor call of the TableName class. This class takes care of escaping and quoting the table name correctly. Names are a dicey topic in SQL, so I will devote a full section to them now.
Names in SQL
Names in SQL can either be quoted or non-quoted. Quoted means that the name is written in double quotes. Basically, you should never use non-quoted names. The first problem they bear is that some names, e.g., ones that have a space in them, cannot even be represented with non-quoted names. Second, if a name is not quoted, it is implicitly lowercased, which can lead to surprising problems. For example, let’s consider we have an extract from Tableau, so we anticipate the table and the schema to be named "Extract". As the table is not in the "public" schema, we need to name the schema explicitly. To do this in SQL, we prefix the name with the schema name, separating the two with a dot. So, you might think that the following SQL successfully queries the table:
"SELECT * FROM Extract.Extract"
However, this query will fail. As the table and schema name are not quoted, they will implicitly be lowercased, so the query will actually be interpreted as:
"SELECT* FROM extract.extract"
Since the table and schema are called Extract with an uppercase E, the name is wrong.
You could do the quoting yourself to make the query look like this:
"SELECT * FROM \"Extract\".\"Extract\""
This will work, but we discourage it. Rather, use the TableName class. The reason for this is that this class not only does the quoting but also escapes the name. The rules for correct escaping in SQL are not straightforward, so you should rather let a class do the work for you. Especially, be sure to use the class if you take user input as names; otherwise, your code will be prone to the dreaded SQL injection attacks:
f"SELECT * FROM \"{userInput}\""

# what if userInput is

# "MyTable\"; DROP TABLE \"MyTable"\" — Hasta la vista :D"
f”strong>SELECT * FROM \”{TableName(userInput)}\””

# This is safe, as TableName will escape the input.
Even if your application is not mission-critical or exposed to people outside your company, don’t give your coworkers the ability to troll you with SQL injection! Just get into a habit of always using the TableName class. Thus, the best code to read an extract table is:
f”SELECT * FROM {TableName(‘Extract’,’Extract’)}”
The eternal truism of SQL: Never put unsanitized user input into a SQL string. Always use the TableName class to refer to tables in SQL.
Updating Databases
Unlike for inserts, there is no special class for doing updates and deletes on a Hyper database. Thus, you have to use the SQL commands UPDATE and NSERT, respectively. I already showed how to execute SQL, so we basically have all we need, so let’s see some small examples.
To give 1000 loyalty points to customer DK-13375, we could use the following code:
row_count = connection.execute_command(

   f"UPDATE {TableName('Customers')}

     SET {Name('Loyalty Points')} = {Name('Loyalty Points')} + 1000

     WHERE {Name('Customer ID')} = {escape_string_literal('DK-13375')}\""

)
As you can see in this example, we not only escape the table name, but also the column names and the string literal. While especially the latter is not strictly necessary, it is definitely recommended to make sure that the query will work, even if the strings contain characters that could be interpreted as SQL syntax (remember SQL injection!). To escape a column name (or rather any name that is not prefixed) we can use the Nameclass. To escape a string literal, we use the function escape_string_literal.
So, I haven’t shown delete yet, but this is hard, because who likes to delete customers? But let’s assume we want to delete unloyal customers with zero loyalty points. The solution is simple:
row_count = connection.execute_command(
f"
WHERE {Name('Loyalty Points')} = 0"
)
Now that you know how to alter the data in a table, let’s briefly cover how to alter its schema. There is actually currently no way to do this directly, e.g., to insert new columns or change the data type of a column. Thus, what you have to do is to create a new table with the new schema, insert the data of the old table into the new one, and then delete the old table.
To insert data from one table to another, you could query the data, read the result, and use an inserter, but this would require a roundtrip from the server to the client and would therefore be very inefficient. Rather, we can use SQL to do the moving of the data from one table to another without ever leaving the server. Let’s pretend we want to move all data from our Customers table to another table Customers2. That other table has yet another column e-mail, which we want to initialize with an empty string. This SQL would solve the task elegantly:
f"INSERT INTO {TableName('Customers2')}

  (SELECT *, '' FROM {TableName('Customers')})"
As you can see, we select all columns of the old table, add an empty string to the end (assuming e-mail is the last column of the new table) and insert the result into the new table.
Avoid round trips between client and server if possible. Hyper itself will always be (way!) faster than any client code you can write.
Reading Data from CSV
CSV (comma separated value) files are the de-facto standard of transporting relational data in a system independent manner. Because this basic format is so widespread, Hyper has built-in support to read it. Thus, you don’t need to build a CSV parser to ingest CSV data into a Hyper table; you can just let Hyper do that for you . The added benefit is that Hyper is again way faster than any code you could write, as it doesn’t need to go through the client but can read the file directly. Craig Bloodworth from our friends at The Information Lab has already measured it and found that Hyper could ingest CSV with 126 MB/sec on his machine; check out his blog post if you want to know more. Moreover, consider that reading CSVs is not even multi-threaded, yet, in Hyper. Once we enable multi-threading, you might get 126 MB/sec/core, so you might be able to read CSVs with gigabytes per second; given that you have a very fast SSD to scrape the data from it, of course.
Okay, so now let’s see how it works. To copy the data, we use the SQL COPY command as follows:/p>
f"COPY {TableName('Customers')}

   FROM {escape_string_literal(path_to_csv)}

   WITH (format csv, NULL 'NULL', delimiter ',', header)"
All that is required is the path to the CSV file and the name of the target table. Check the documentation to learn more about the options you can specify in the WITH clause.
Transferring Data Between Databases
So far, we have only worked on one database at a time. However, I mentioned in the beginning that more than one database can be attached to a connection. This can become handy when you want to combine data from multiple databases. For example, you might want to copy a table from one database file to another or combine tables from two databases into a third one. Of course, you could do that by reading the data and using an inserter to get it into another database, but as mentioned above, you should avoid these client-server round trips if possible; and it is possible indeed.
Let’s pretend we want to move data from a database called “customer.hyper” to a database called “target.hyper”. To do all that, we first need to attach more than one database to a session:
with Connection(endpoint=hyper.endpoint,

                  database="./customer.hyper") as connection:

      # Attach second database

      connection.catalog.attach_database("./target.hyper")
Now that two databases are attached to the session, we need to get more precise when naming tables, as Hyper can no longer infer in which database a specific table resides. Thus, we have to add two prefixes to the table: The schema name and the database name. The database name is by default the stem of the file name (i.e., the filename without the “.hyper” extension). Thus, the table Customersin the "public" schema in the “customer.hyper” database would be addressed as TableName('customer','public','Customers'). Let’s pretend the “target.hyper” database also has a table named Customers with the same schema. Then, we can simply use the INSERT statement I’ve shown above to move data from one table to another. Hyper doesn’t care that the two tables are in different databases; the insert works exactly as if the two tables were in one:
f"INSERT INTO {TableName('target','public','Customers')} (SELECT * FROM {TableName('customer','public','Customers')})"
Besides moving the data between databases, we can also just use both databases in one query. For example, to find which customers are in the customer database but not in the target database, we could use the SQL EXCEPT operation as follows:
f"(SELECT * FROM {TableName('customer','public','Customers')}) EXCEPT (SELECT * FROM {TableName('target','public','Customers')})"
Querying Metadata
Pretend a coworker sends you a database file that you know nothing about; you don’t know what tables are in there and what they look like. Hyper API allows you to discover that. Querying metadata means asking questions such as:
- Which schemas are in a database?
- Which tables are in a schema?
- Which columns does a table have?
In SQL, querying metadata is usually pretty hard, as there is no easy standard way of doing it. Instead, databases expose non-standard system tables containing the information, but these are hard to query correctly. Therefore, the Hyper API contains a class to do the tedious task of assembling metadata queries behind the scenes and offer easy functions for the questions above. We already know the class, it is the Catalog. Until now, we have used it to create a table and to attach another database to the connection, but we can also use it for metadata queries. Here are the methods to answer the questions above:
get_schema_names: Given a database name (or no name at all if only one database is attached), returns a list of all schemas in the database.get_table_names: Given a schema name, returns a list of all tables in that schema. In case only one database is attached, no name has to be provided. In this case, the tables in the public schema will be listed.get_table_definition: Given a table name, returns the table definition of that table. The table definition is exactly the object we already used to create the table in the first place. It contains all necessary information about the columns of the table.
For example, the following code will print information about all columns in all tables in the public schema of a database:
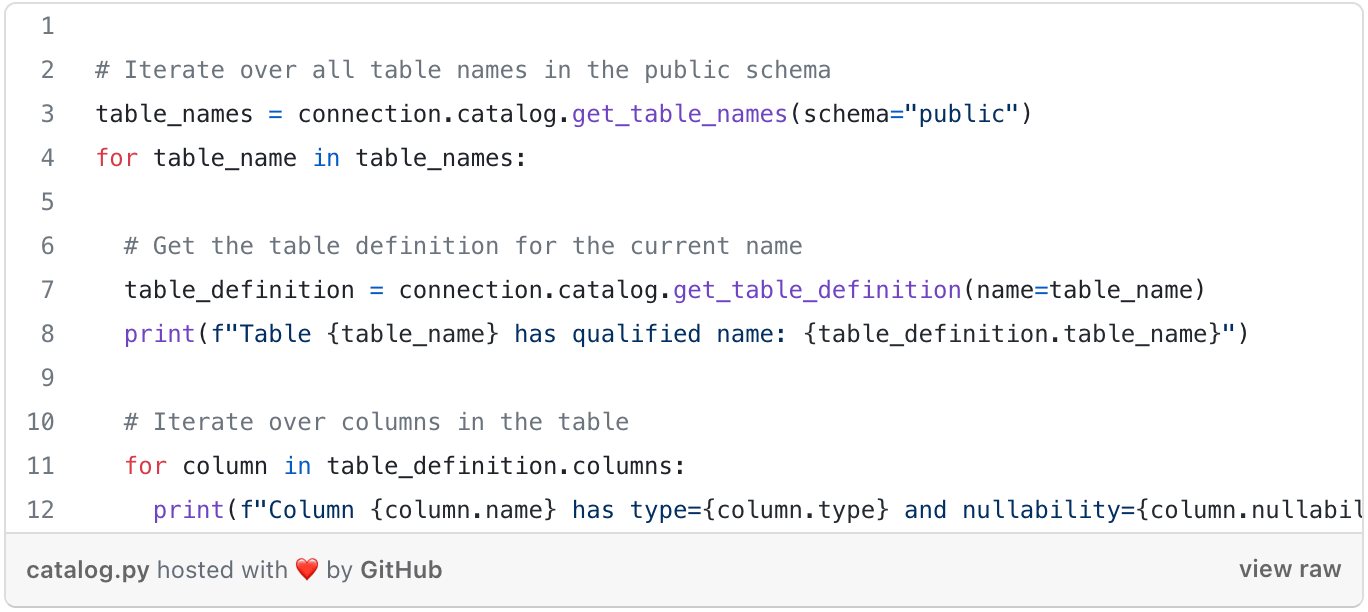
Querying the metadata can be useful when handling a database with unknown or not well defined contents or when writing a script that does bulk operations on a set of databases. For example, we could implement a full text search, which searches all text columns in all tables in all extracts in a directory for a specific term. Such an example would go beyond the scope of this blog post, but I think you get the idea. Doing such search operations on a set of workbooks can be a very mighty new tool if your company has a large number of workbooks lying around and nobody exactly knows anymore which information is contained in what workbook.
This concludes the walkthrough of our API. There are some more minor methods in the API, but I think I covered all the major important functionality. Feel free to browse the Hyper API reference pages to learn about every last method.
Performance Considerations
We talked to various beta customers and therefore know that many also want to use the API to speed up their (huge) extract creation scenarios. As the API interacts directly with Hyper, you can usually expect a well-written program using the API to outperform extract creation with Tableau (of course, you pay with less convenience, but if you have billions of rows to extract, performance can quickly become paramount). To make sure you get the most out of your usage of the API, I want to share some performance tips and tricks with you:
- Use the correct data type and its functions! If you have integer data, use integer as column type, not text! If you do date calculations, use our builtin date functions. We have seen countless times customers defining each and every column as text and then fiddling around with string functions to achieve their goal. I know it’s tempting to just use text all over the place, but you will pay with performance and increased file size.
- Don’t do round trips between client and server if not necessary. Data should stay in Hyper as long as possible, as shown multiple times in this post.
- If you’re ingesting from CSV, use Hyper’s CSV COPY command as shown instead of parsing the CSV in the client and then using the
Inserterclass. - Get a good SSD and enough RAM. Hyper is a main-memory-optimized system. Giving it enough RAM to do its processing is important. Hyper will slow down severely if intermediate results don’t fit into main memory. Note though, that this doesn’t mean that your whole data set has to fit into main memory. Hyper is clever when accessing data. For example, when scanning a table, Hyper will only load the parts of the table that it is currently scanning into main memory, so you can indeed read a 1TB table efficiently on a machine with much less RAM.
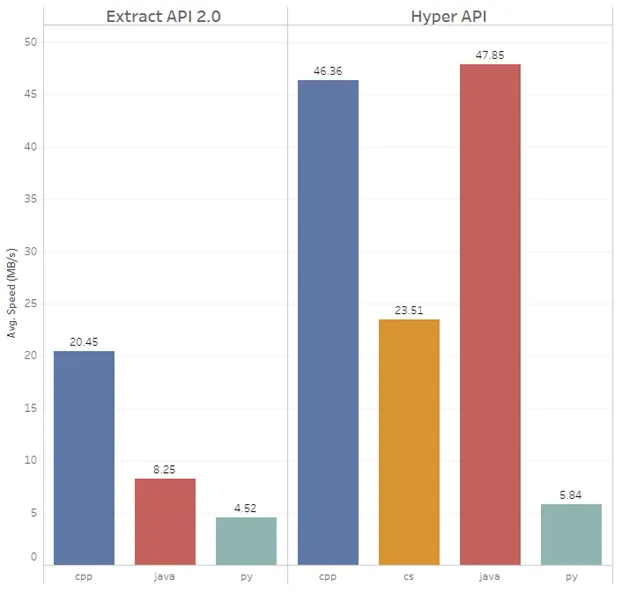
- If you do heavy lifting in the client, such as when inserting a lot of rows using the
Inserterclass or reading large query results, consider switching from Python to a language with better performance. The figure on the left shows insert performance using theInsertclass in the supported client languages (right group of bars) and compares it to the performance of our old Extract API 2.0 (left group of bars). The bar length shows MB/sec insertion speed, so the larger the bar the better. In our measurements, Java and C++ were the fastest, .NET is slower but not so much. However, Python is way slower than the other three. After all, it’s a script language designed for simplicity instead of performance. We can’t change that, so plan accordingly. Inserting a few thousand rows in Python is no problem, but once you go to tens of millions of rows and don’t want to wait, consider switching to another language. Ingesting CSV files with the COPY command is fast in every language, however, as the data doesn’t flow through the client but is instead parsed directly by Hyper.
How to Get Help
While this blog post should contain enough info to get you going, you might need some additional knowledge to get your scenario implemented. The first obvious point would be the reference page of the API. There is an API documentation for each language (Python, Java, .NET, C++) and a documentation of Hyper’s SQL dialect. We also have a github repository with various code samples that you can use to get started. If that isn’t sufficient, feel free to post a question at our community forums or at stackoverflow. If you want to talk in person, sign up for our Tableau Conference or Tableau Conference on Tour, we always have some Hyper developers at these conferences and we love chatting about how customers use our products; especially if the product is something as geeky as an API.
Conclusion
I hoped you enjoyed this little walk through our new API. Now it’s your turn! Build something great harnessing the power of Hyper. If you’ve got an interesting scenario, especially one that is a challenge even for Hyper, let us know. Also if you have got any feedback, feel free to send it over; we’re always interested in making Hyper API even better.
Relaterade berättelser

Which Model Speaks Your Data Language? A User-Centered Approach to Evaluating LLMs for Conversational Visual Analytics
 14 April, 2026
Rethinking How Data Workers Revisit Analytical Conversations and Communicate Insights
 10 April, 2026

Stepping through Charted Territory: Creating Interactive Step-by-Step Dashboards Tours
 8 Juni, 2025