Tableau Online tips: How to sync on-premises data in Tableau Online
Learn how to ensure your on-premise data is always pushed to Tableau Online.


Editor’s Note: Tableau Online is now Tableau Cloud.
This post is part of our series covering tips, tricks, and ideas in Tableau Online, our cloud collaboration and sharing platform.
Earlier in this series, we covered the differences between extracts and live connections as well as when to use each. We also walked through the process of keeping that data fresh with live database connections and refreshes using Tableau Online's sync client. For on-premise data, you can use the Tableau Online sync client to push extract refreshes to Tableau Online. This post focuses on managing the sync client. Here are five tips to ensure your latest on-premise data gets pushed to Tableau Online.
1. Run the sync client continuously, even when logged out of Windows
By default, the sync client runs as a Windows system-tray application. This means that it can only refresh on a schedule when you’re logged in to Windows. Alternatively, you can run the sync client continuously as a Windows service. Doing so allows you to log out of Windows, and (as long as your computer is on) refreshes will continue to occur. If you run Tableau Desktop on a Mac, or if you want to turn your computer off, you can run the sync client continuously on a different machine. This could be a dedicated VM, or any other compatible computer you have that is always on. To run the sync client continuously, follow the steps below.
- In Tableau Desktop, make sure you are connected to your Tableau Online site. Select Server in the toolbar, then "start Tableau Online sync client."

- In your system tray, select the sync client icon.

- Click "run continuously."
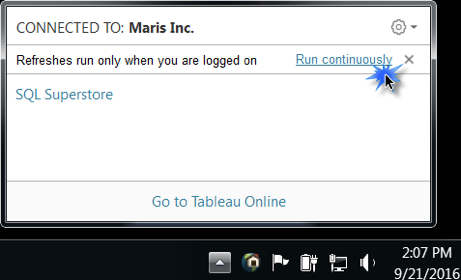
- Enter your Windows administrator credentials.

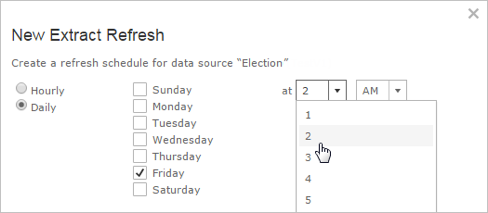
2. Create custom refresh schedules
With the sync client, you can create custom schedules to refresh your data, down to 15-minute intervals. Here’s how:
- While you are signed in to the sync client, open it by selecting its icon in the system tray.
- Point to the data source you want to schedule, then click the Schedule icon. This opens a browser window to the Refresh Schedule page in your Tableau Online account.

- To create a new schedule, click "new extract refresh." Or to edit an existing schedule, select the check box next to it, and then on the Actions dropdown list, select "change schedule."
- In the schedule dialog box, set the new schedule:
- To refresh at a specific time on selected days: Select "daily," select the days of the week, and then select the time of day from the drop-down lists.
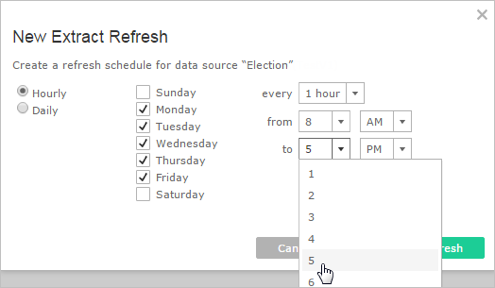
- To refresh at an interval on selected days: Select "hourly." Then you can specify the days of the week, the frequency within the day, and the times of day. For example, refresh Monday–Friday, hourly between 8 a.m. and 5 p.m.
 If available, specify whether you want a full or incremental refresh. By default, Tableau Online runs a full refresh (incremental refreshes are available only if you’ve configured them in Tableau Desktop before publishing the extract).
 - Click "schedule refresh" or "change schedule."
- To refresh at a specific time on selected days: Select "daily," select the days of the week, and then select the time of day from the drop-down lists.
3. Embed and update your database credentials
If you want to set refresh schedules for data sources like SQL Server, Oracle, or any other database that require user authentication, you need to store ("embed") those credentials in the connection information. The sync client will use the embedded credentials to access the database, create refreshes, and push them to Tableau Online. Note: When using the sync client, you need to embed credentials even if you've previously chosen to embed credentials when publishing the data source from Tableau Desktop, or if you added credentials via the Data Connection page on Tableau Online.
- Open the sync client, point to the data source, and click the Edit icon that appears.
- Enter the user name and password for accessing the data, and click "save."

4. Edit the file path of a data source when its location changes
If you send data updates from a Microsoft Excel workbook, .csv, or .txt file, you will need to update the file location in the sync client if you move that file.
- Open the sync client, point to the data source, and click the Edit icon that appears.
- In the file path dialog box, provide the updated information and click "save."

5. Receive an email when refreshes fail
Extract refreshes can fail for any number of reasons. Make it easy on yourself by enabling email notifications in your Tableau Online site settings to be alerted anytime a refresh fails. As a site admin, simply check the email notifications box under the Settings tab. Individual users are able to opt out of failure notification emails in their account settings.  Catch up on previous blog posts on the Tableau Online Tips page, and be on the lookout for future installments in the Tableau Online Tips series. If you haven’t yet tried Tableau Online, start a free trial today! And visit our Tableau Server & Tableau Online Admin Community Forum to continue to conversation.
Histórias relacionadas
Trusted, Real-Time Insights for All: Tableau Brings Conversational Analytics to Cloud & Server
 30 Julho, 2026
How Tableau is Expanding Access to Agentic Analytics Across the Enterprise
 22 Julho, 2026

The Tableau+ Bundle with Premium AI, Enterprise Capabilities, and Premier Success
24 Junho, 2026