Using Tableau Prep to track account balance history from Mint


A version of this post originally occurred on Joshua Milligan's blog, VizPainter.
I personally use Mint to track my personal finances (I’m not officially endorsing, but it does help me get the data). I use Tableau Prep when I have messy data that I need to clean and structure. That gave me an idea: I can use Tableau Prep to track account balance history (and much more, but that’s another post…)!
Now you may not use Mint, but if you’ve ever tried to parse data copied from a website, you know that it can sometimes be challenging. I thought I’d share this example to help spark some ideas about how unstructured data can be tackled using Tableau Prep!
Account balance history in Mint
After I’ve synced all my accounts in Mint, I can see them in an Overview, like this:
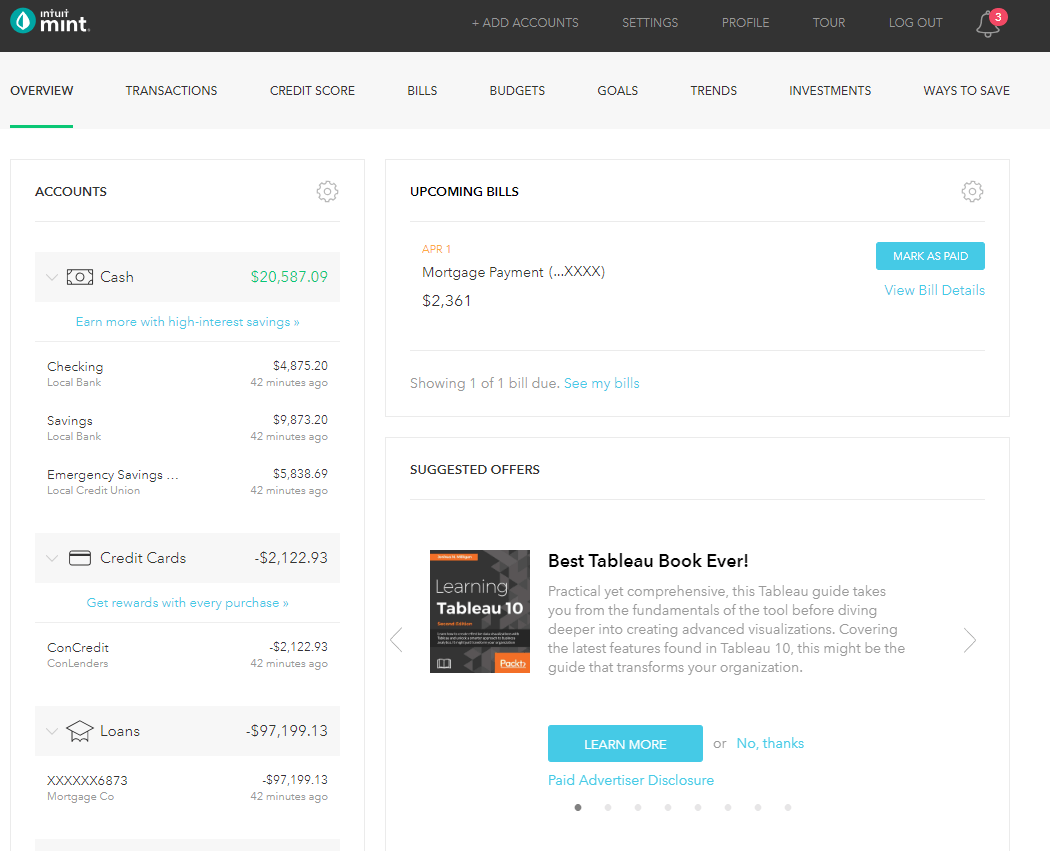
The data is made up, but the problems are real!
The left panel gives me a breakdown of accounts by type (Cash, Credit, Investment, Property) and then individual accounts and current balances for each type. The rest of the page is taken up with various sections such as upcoming bills (yuck), suggested offers, an updated credit score, and even some charts and graphs (but I want to make my own in Tableau so I can make my own discoveries).
Now Mint does allow me to export every transaction for every account (if it has a record of it) and that’s an exciting data set for another day. And I’m not the first to notice this rich data set – Mike Nealey wrote about using parsing it with Alteryx here.
But when it comes to account balances, I just get to see the current balance for the day and don’t get to see or export account balance history from Mint (though, that would be a great feature). So, I have my own process. It’s a couple of manual steps, but I’ve built a rich data set with it that helps me make sure I’m on track with financial goals.
Exporting account balance history from Mint
Here’s my process to export account balance history from Mint:
- On the Overview tab of the Mint home screen press Ctrl + a to select all the text on the page. Yes, this gets menus, advertisements, copyright messages, and more. I don’t care!
- In Notepad (or whatever text editor you fell like), paste the text.
- Save the file with the date as the name. I like to use the format YYYY-MM-DD.txt as it keeps the files in order in the directory listing and is easily parsed in Tableau Prep, which we’ll see in a moment.
Now I said I was exporting the account balance history. Okay, not really...it’s just the current account balances for the day. So I have to do this periodically. If I’m obsessive, I might do it daily. But if I miss a few days or weeks, it won’t really matter because I can still build up a very impressive history of account balances.
The “Account Balance” file
Here’s what the text file looks like:

It’s got my accounts and account balances (highlighted) along with a lot of other junk. But I’m not going to worry about cleaning anything here. I’m just going to leave it as is and start collecting similar files every so often. I’ll pile them up in a directory and then unleash the power of Tableau Prep to get the data I want.
Using Tableau Prep with unstructured data
All data has some structure—but this is far from the rows and columns you’d expect from a database or spreadsheet. Working with this data in Tableau Prep really shows off Tableau Prep’s ability to give you a flow of thought as you tackle some unique challenges. By the way, this is a one-time setup. My goal is to design something that I don’t have to change as I collect data.
The date of the snapshot
I’ll start with a wildcard union to all the files so I can get the full account history from Mint snapshots.
That also gives me a File Paths field that I can leverage to get the snapshot date:

Just click the ABC to change it from a string to date and then change the name of the field.
Removing junk records
Now, start working on the rest of the data in the file. It appears in a single field (as there are no tabs or any other delimiters Tableau Prep detected to break up the fields):

It’s a record for each line of the text file. I see some of the accounts and account balances there, but there’s a lot of the junk too. I can eliminate the junk fairly quickly. One thing I noticed just by looking at the text file above and the highlighted rows I want to keep: they all start with either a dollar sign ($) or a negative sign (-)
Actually, some lines start with spaces. So, the first thing I’ll do is select the Options button on the field and then Clean > Trim Spaces. Then, I can filter to keep only records that start with the character I want:

That gets rid of a lot of the junk right off. There are still some lines that started with one of those characters that are not one of my accounts:

I now have some options to consider:
- I could manually select what I want to keep or exclude. But as new data is acquired, the values will change and this manual selection won’t be valid anymore.
- I could try to extract the numeric parts of the field with REGEX or some clean options. But as I look closer there are some accounts that have numeric portions too (e.g. 529 and 401K).
The one thing that does stand out as helping me identify records I want to keep is that all of the account fields contain a decimal while most of the others don’t. So, I can create another filter to keep only those records:
CONTAINS(F1, “.”)

Separating the balance from account name
At this point, I’ll split out the values from the remaining text. Most of that will be the account name. And where it’s not, I can filter. I’ll do this with a couple of calculated fields.
Account Balance
MID([F1], 0, FIND(F1, “.”) + 2)
Not only did the decimal point tell me which fields were useful, it also helps me split the string. Starting from the left (0) and going to the position of the decimal + 2, I’ll get the amount. (I’ll also get a $ symbol, but I can use the REPLACE() function to get rid of that.)
Account Name
MID([F1], FIND(F1, “.”) + 3)
In this case, we’ll start after the decimal places to pick up the account name (hence the + 3 as the starting position with no ending position specified).
Now, it’s easy to locate the Account Names that aren’t really accounts and exclude those from the data set:

Not only are they excluded, they won’t ever show up again. If I’d excluded them from field F1, then the next snapshot would have different values (hopefully Debts is going down and Assets is going up!) and the filter wouldn’t be set for those specific values. But now ASSETS, DEBTS, and NET WORTH will always be gone from the data set no matter what balance they have.
With a bit of cleanup, I can also:
- Make Account Balance numeric
- Remove the F1 field
Finally, I’ll extend the data set a bit more by grouping the account names into account types.
Grouping the accounts into account types
I’ll start by creating a calculated field called Account Type, which is just a copy of Account Name:

I’ll do this because I want to group the names into types, but Tableau Prep will do that within a single field and I want to retain the names and build out a hierarchy, like this:

And with that, I have a nice data set containing my account history from Mint and can start exploring in Tableau!
Related Stories

Data trends that will impact you in 2022

Healthcare Analytics Hub Starter Kit: Get the data you need faster
 October 18, 2019
The purpose of the Healthcare Analytics Hub Starter Kit is to provide a sample of what your healthcare app could look like. It’s not a complete solution; instead, it’s focused on what’s possible. Please contact your Tableau Account Manager to get started today!
Stop Looking at the Wrong Marketing Metrics
 April 5, 2018
Stop looking at the wrong marketing metrics—see how TeamSnap is accomplishing this with Tableau and Google.
Subscribe to our blog
Get the latest Tableau updates in your inbox.