Mapping Real Time Flights (Advanced)


Julien Godenir uses Tableau as part of his job at Travel Planet, and likes to analyze data for fun on Tableau Public. The beginner section of this post is available here.
You want to map moving flows in real time? You've enjoyed the first section of this blog post? Then let's add some complexity to our visualization by:
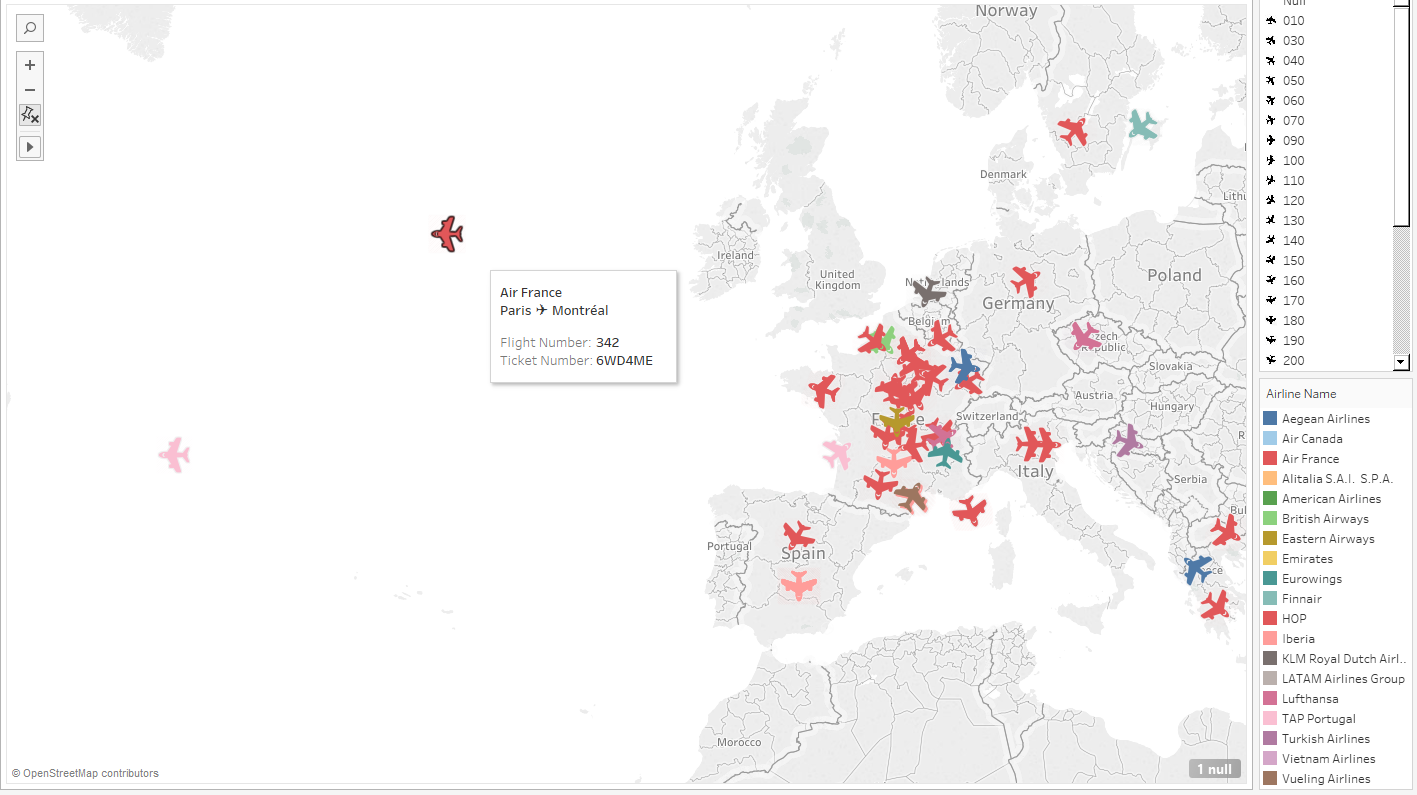
- Adding a custom shape (plane/train/car) facing the direction of its destination, like in flightradar24.com
- Rendering the curvature of the earth in the trajectory of our flows
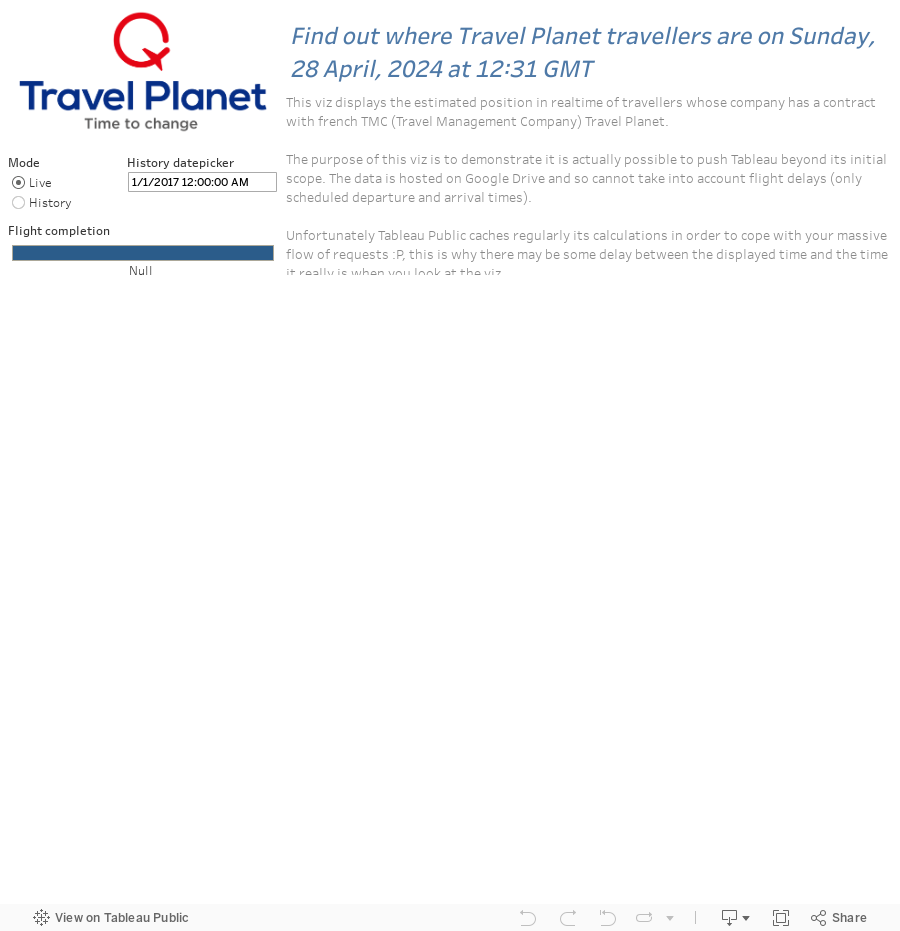
The result will look like this:
1. The Data
The best would be to read the beginners' version of this blog post to learn which fields are necessary and sufficient to build such a viz. Have a flight to catch? Here's a quick summary:
- 2 datetime fields, in this example: Departure_Datetime and Arrival_Datetime
- 2 points geocoded by latitude and longitude, here: Departure_Lat, Departure_Lon, Arrival_Lat, Arrival_Lon
2. Your Icon
Second you need an image of a plane (or train, or car) ! I chose the simple ✈ icon below. You could choose any other image, but the nose of the plane has to be towards the right! Name it plane.png.
3. Generate 36 Icons Thanks to Python!
Then, you want your little airplane to fly in all directions, all over the planet! Thus, you'll need to make 36 images of the plane, each one rotated by 10°. But this is tedious and I am lazy so I used a little code to make this quickly ! Do you know Python? This is one of the easiest programming languages I know. If time allows, you'll definitely benefit from learning it!
Just download Python 2.7, and open a command line Windows + R on Windows then ‘cmd’ enter.
Type in the following command:
pip install pil
This command should install a python library for image processing. Then create a new file with a .py extension. Open it with your notepad for instance and copy-paste the following code:
from PIL import Image
src_im = Image.open("plane.png")
im = src_im.convert('RGBA')
for i in range(36):
rot = im.rotate(i*10)
rot.save(str(i*10).zfill(3)+"plane.png")
See? I have written all the code for you, save your new python file with this nice code and that’s it! Time to run it!
If you want to run the code, simply open your command line like before and run:
Python yourscript.py
It should create for you 36 images of your plane each time rotated by 10° !!! Et voilà! It wasn’t hard to code a little, was it? Now, just copy your shapes in a new folder in your Tableau Repository's Shapes file.
4. Be Ready for Some Geocoding
Lines on a map in Tableau are great but they do not reflect the curvature of the earth, so we need to approximate it. There is all you need to know about bearings, geo-coordinates and angles on this website. You can also read this Wikipedia page.
So first we need to calculate our latitudes and longitudes for departures and arrivals in radians rather than in degrees, because we are going to use a lot of SIN() and COS() and they only work in radians. Those are the fields you will see later in formulas as Dep Lat Rad, Dep Lat Long, Arr Lat Rad et Arr Lat Long.
Then, we will need to create the following calculated fields in order to obtained the curved routes:
h = sin²(Δφ/2) + cos φ1 ⋅ cos φ2 ⋅ sin²(Δλ/2)
δ = d/R = 2 ⋅ atan2( √h, √(1− h) )
A = sin((1−f)⋅δ) / sin δ
B = sin(f⋅δ) / sin δ
x = A ⋅ cos φ1 ⋅ cos λ1 + B ⋅ cos φ2 ⋅ cos λ2
y = A ⋅ cos φ1 ⋅ sin λ1 + B ⋅ cos φ2 ⋅ sin λ2
z = A ⋅ sin φ1 + B ⋅ sin φ2
φi = atan2(z, √x² + y²)
λi = atan2(y, x)
It might be a bit intimidating displayed like this, but don’t worry I have broken it down for you and taken screenshots of my Calculated Fields in the next section.
5. Tableau Your Data
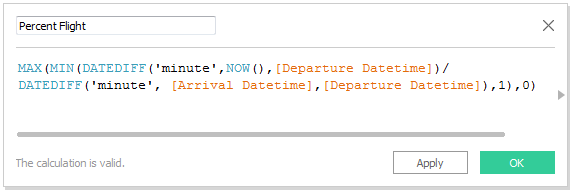
a. Calculate how much of the flight has already been done based on your departure and arrival datetimes:
- MAX(MIN(DATEDIFF('minute',NOW(),[Departure Datetime])/DATEDIFF('minute', [Arrival Datetime],[Departure Datetime]),1),0)
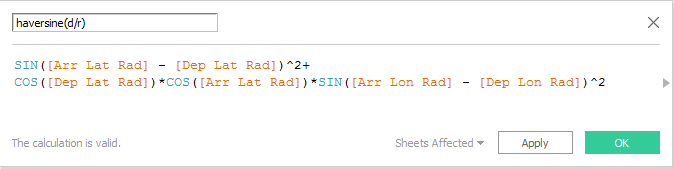
b. Calculate the haversine formula with your latitudes and longitudes for departure and arrival (in radians with the function RADIANS()):
- SIN([Arr Lat Rad] - [Dep Lat Rad]) ^2 + COS([Dep Lat Rad]) * COS([Arr Lat Rad]) * SIN([Arr Lon Rad] - [Dep Lon Rad]) ^2
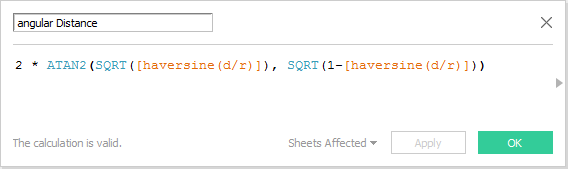
c. Calculate the angular distance between the departure point and the arrival point:
- 2 * ATAN2 (SQRT([haversine(d/r)]), SQRT(1 - [haversine(d/r)]))
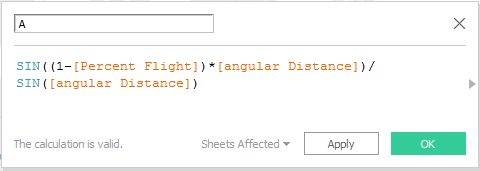
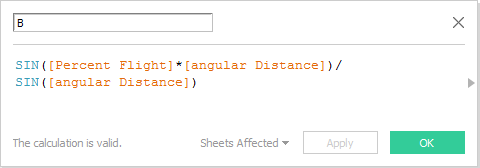
d. From here, you just need to recalculate the coefficients of the formula:
- SIN((1-[Percent Flight])*[angular Distance]) / SIN([angular Distance])
- SIN([Percent Flight] * [angular Distance]) / SIN([angular Distance])
- [A] * COS([Dep Lat Rad]) * COS([Dep Lon Rad]) + [B] * COS([Arr Lat Rad]) * COS([Arr Lon Rad])

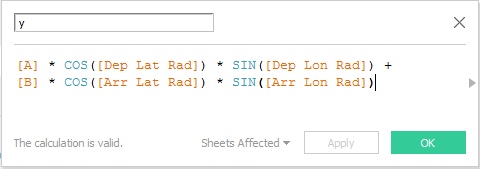
- [A] * COS([Dep Lat Rad]) * SIN([Dep Lon Rad]) + [B] * COS([Arr Lat Rad]) * SIN([Arr Lon Rad])
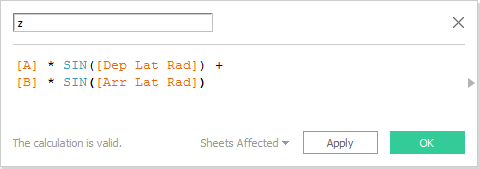
- [A] * SIN([Dep Lat Rad]) + [B] * SIN([Arr Lat Rad])
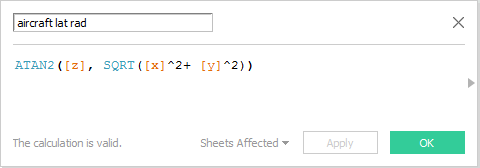
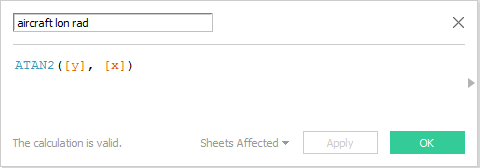
e. Almost done! You can now calculate the estimated geo coordinates of the aircraft as follows:
- ATAN2([z], SQRT([x]^2 + [y]^2))
WARNING, the result is in radians, don’t forget to use DEGREES() to get a result Tableau can understand.
- ATAN2([y], [x])
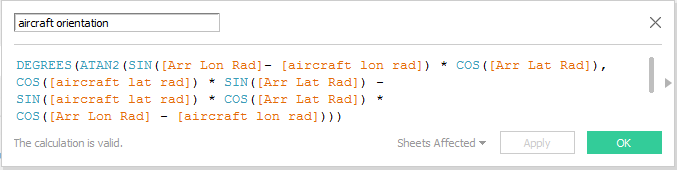
f. And you can calculate its orientation as follows:
- DEGREES (ATAN2(SIN([Arr Lon Rad] - [aircraft lon rad]) * COS([Arr Lat Rad]), COS([aircraft lat rad]) * SIN([Arr Lat Rad]) - SIN([aircraft lat rad]) * COS([Arr Lat Rad]) * COS([Arr Lon Rad] - [aircraft lon rad])))
- RIGHT("00"+REPLACE(STR(FLOOR(IIF([aircraft orientation] 0, [aircraft orientation] + 360, [aircraft orientation]) + 5)/10)*10), '360', '0'), 3)
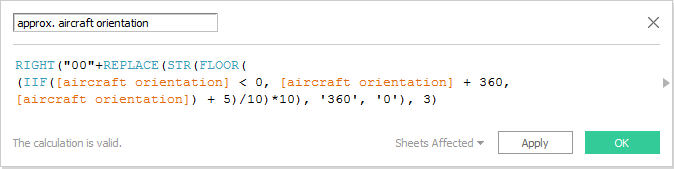
6. Shape Your Flights!
If you have enough planes, they should statistically display any orientation between 000 and 350. Therefore, you can assign the new shapes to the field “approx. aircraft orientation”. The shapes should automatically be perfectly assigned to each plane since Tableau assigns them alphabetically.
You now need to drag and drop your last 2 calculated fields “aircraft lat” to rows and “aircraft lon” to columns.
Last but not least, if your viz is showing real time data, use a filter to only display the planes for which departuredate now() and arrival_date > now(). This will leave only the planes currently in the air right now!
And there you go! A Flightradar24 like viz in Tableau! If you want, you can try and take this approach a little bit further to get some trails behind the planes!
相关故事

Meet Iron Viz 2024 Finalist Jessica Moon
 2024/04/15

Meet Iron Viz 2024 Finalist Pata Gogová
2024/04/08
Student to BI Analyst, How Tableau Can Lead to a Successful Data Career
 2024/03/20
Subscribe to our blog
在您的收件箱中获取最新的 Tableau 更新。