Subject Area: Design
Level of complexity: Intermediate
Approximate Time to complete: 1 hour
Companion Workbook (twbx): FloatingAndTiledLayoutArrangementsInDashboards.twbx
Additional Resources on the web:
The default dashboard layout arrangement places worksheets (and other objects such as text boxes, images, and web pages) as tiles in a dashboard. As a user drags and drops a worksheet onto a dashboard, a gray rectangle appears to indicate where the worksheet will be placed relative to other worksheets already in the dashboard.

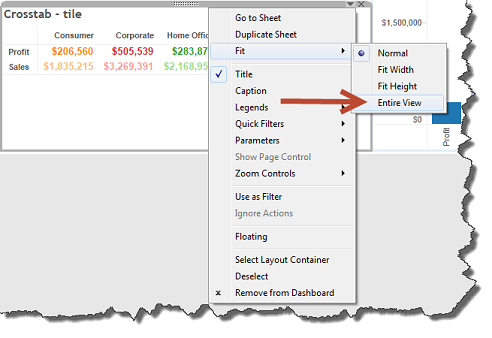
Worksheets added as tiles are allocated exclusive space on the dashboard and may not be made to overlap with each other. Adding worksheets as tiles fills the entirety of the dashboard, meaning there will never be any unallocated dashboard space. (There may appear to be unallocated space because a worksheet does not fill the entirety of its allocated space. To change this, click the drop-down caret in the upper right corner of the worksheet, select Fit, select Entire View.)
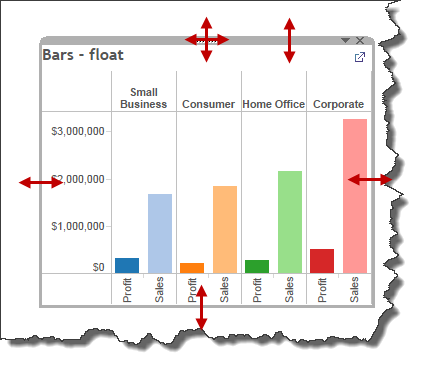
Hovering the cursor over where two adjacent sheets meet allows the user to grab a black line and adjust the width or height of both sheets.
In a tiled layout it is not possible to adjust the width or height of one tile without adjusting the width or height of an adjacent tile. (Tip: if you wish to create blank space around a tiled worksheet to visually separate it from the others, you can (1) drop a Blank object into the dashboard or (2) place the worksheet in a tiled layout container - http://onlinehelp.tableau.com/current/public/online/en-us/dashboards_organize_layout.html - and add a thick border to the layout container that is the same color as the dashboard background.)
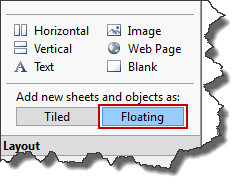
Rather than add worksheets and objects as tiles, a user can add them as floating worksheets and objects. Floating worksheets may be added directly into the dashboard by selecting "Add new sheets and objects as: Floating"
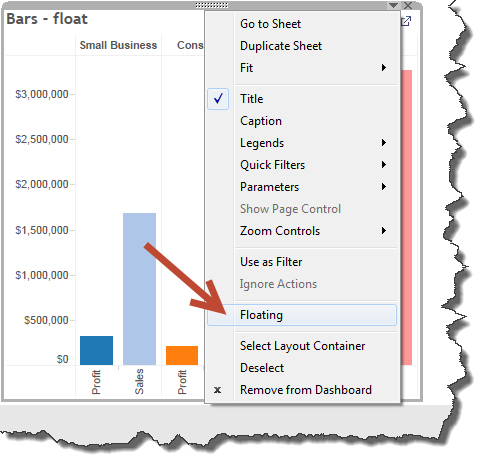
or by changing an existing tiled worksheet to a floating worksheet by clicking the drop-down caret in the upper right of the worksheet and selecting "Floating." (Tip: the reverse is also true – you can change an existing floating worksheet to a tiled worksheet in the same manner.)
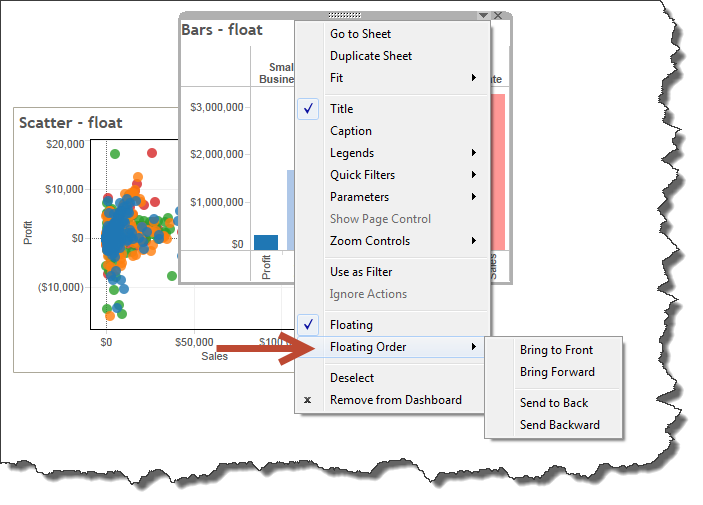
A floating worksheet occupies a non-exclusive area of the dashboard, meaning that separate floating worksheets may overlap each other. You can change the order in which overlapping floating worksheets are stacked by clicking the drop-down caret on a worksheet and selecting "Floating Order."
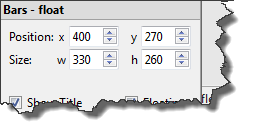
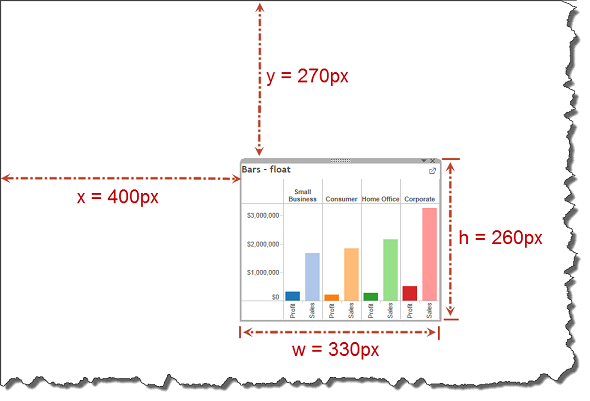
The space that a worksheet occupies is determined by the user specifying the width and height of the worksheet and position of its upper left corner relative to the upper left corner of the dashboard. The width, height, and position may be specified by manually adjusting the floating worksheet by hovering over the edges and top middle of the worksheet and then dragging,
...or by entering pixel counts in the bottom left of the workspace where x denotes the horizontal distance (in pixels) from the left edge of the dashboard to the left edge of the worksheet, y denotes the vertical distance from the top edge of the dashboard to the top edge of the worksheet, w denotes the width of the worksheet, and h denotes the height of the worksheet.
There are significant advantages and disadvantages to both tiled and floating layouts. Tiled layouts ensure that each worksheet/object is fully visible, whereas floating layouts allow one worksheet to obscure the data in another when overlapped, which is especially problematic when using filters since the views that are created will be different. Floating layouts allow an end user to cover up undesired blank background space in one worksheet with another worksheet, whereas tiled layouts display the entirety of each worksheet, including any blank background space. When changing the dashboard size, worksheets expand/contract their positions and sizes proportionally to the overall change, which means that tiled worksheets will maintain a similar relative layout, whereas overlapping floating worksheets will appear to change position relative to each other. (Tip: adding borders and background colors are an excellent way to visually offset worksheets, especially those that overlap in a floating layout.)
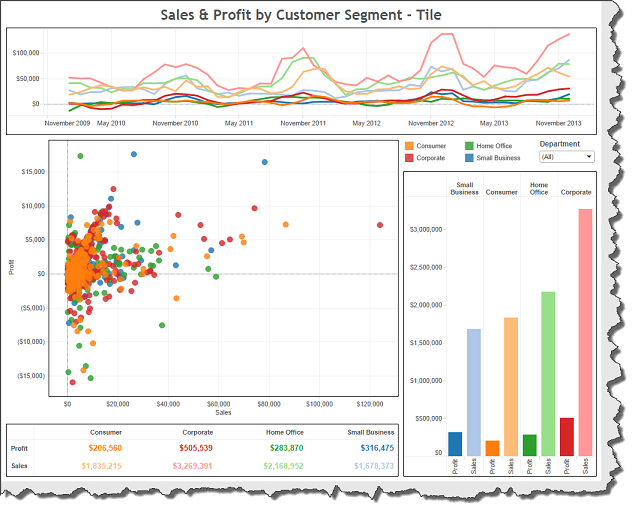
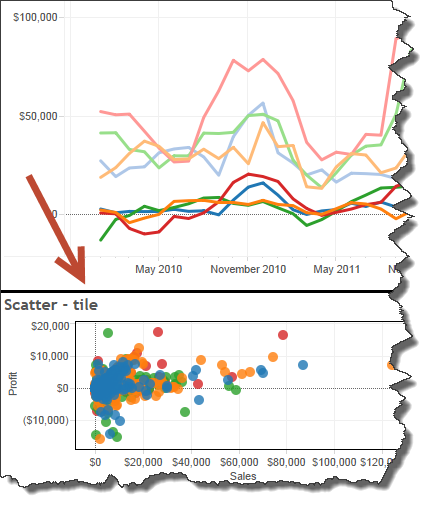
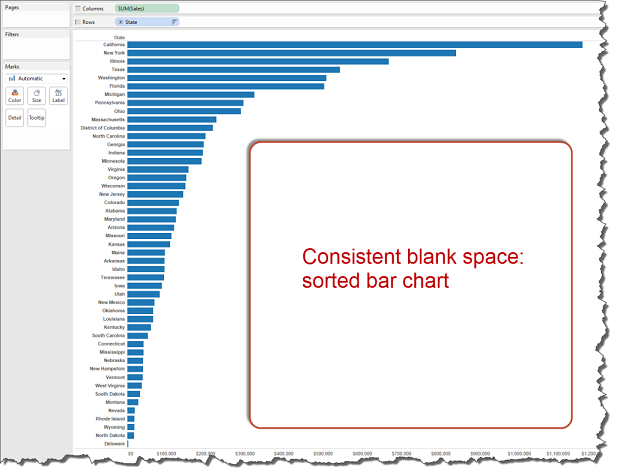
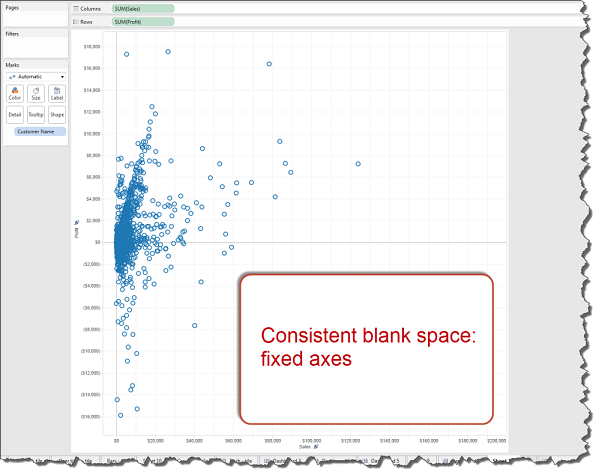
How do you know when to choose a floating layout over a tiled layout? Here are some rules of thumb. (1) If the worksheet underneath the floating worksheet in question contains a consistent blank space that won't be altered by filtering. Examples of this include bar charts sorted ascending or descending and charts with fixed axes.
or (2) If you wish to place worksheets on top of a background image.

or (3) If the size of the dashboard will be changed infrequently or never. (4) If artistic aesthetic and linear disruption are design priorities of yours. (5) If you prefer little space between your worksheets.
How do you know when to choose a tiled layout over a floating layout? (1) If the worksheets in the dashboard do not contain consistent blank spaces. (2) If you are not using a background image. (3) If the size of the dashboard will change frequently (e.g., the dashboard size is set to automatic). (4) If you care more about understandability than aesthetic, or prefer a strict utilitarian aesthetic. (5) If you prefer lots of space between worksheets.